Hoshang Mehta
How to Build Your First MCP Tool on a Data View
You've built your first data view. That's great—but views alone don't do anything. They're just SQL queries sitting in your project. To make them useful, you need to turn them into MCP tools—functions that AI agents can actually call.
This tutorial will walk you through creating your first MCP tool in under 10 minutes. We'll use Pylar's AI to generate the tool from natural language, test it to make sure it works, and publish it so agents can use it. By the end, you'll have a working tool that an agent can query, and you'll understand why tools are the bridge between your data and AI agents.
Why This Approach Works
Before we dive into the steps, let me explain why tools matter and how they fit into Pylar's "Data → Views → Tools → Agents" approach.
The Problem: Views Aren't Enough
A view defines what data agents can access, but it doesn't tell agents how to access it. An agent looking at a view doesn't know:
- What questions it can answer with that view
- What parameters it needs to provide
- How to structure queries
- What the results mean
Without tools, agents would need to write SQL queries themselves—and we've already established that's a bad idea. Agents don't understand your business logic, your data relationships, or your query patterns.
Why Tools Solve This
MCP tools are like functions that wrap your views. They:
- Define the interface: Tell agents exactly what the tool does and what inputs it needs
- Handle the query logic: Write the SQL for you, so agents don't have to
- Accept parameters: Let agents provide inputs (like customer IDs, date ranges, etc.) that get injected into queries
- Return structured results: Give agents data in a format they can understand
Think of it this way: a view is like a database table. A tool is like a function that queries that table. Agents call the function, not the table.
How Tools Fit into the Bigger Picture
Tools are the layer that makes views actionable:
- Views define what data is available (security and governance)
- Tools define how agents interact with that data (interface and logic)
- Agents call tools to get answers (usage and value)
You can create multiple tools on the same view, each serving a different purpose. For example, on a customer view, you might have:
get_customer_by_id- Fetch a specific customerget_high_value_customers- Filter by revenue thresholdsearch_customers- Search by name or email
Each tool queries the same view, but in different ways. This gives agents flexibility while keeping your data secure.
Step-by-Step Guide
Let's build your first MCP tool. I'll walk you through using Pylar's AI to create a tool from natural language—it's the fastest way to get started.
Prerequisites
Before we start, make sure you have:
- ✅ A data view created in Pylar (if you don't have one, follow the previous tutorial: "How to Build Your First Data View in Pylar")
- ✅ The view selected in the right sidebar
- ✅ Access to Pylar AI (available in the right sidebar)
If you haven't created a view yet, go back and do that first. Tools are built on top of views, so you need a view to create a tool.
Step 1: Select Your View
Before asking the AI to create a tool, you need to tell it which view to use.
-
Navigate to Your Project: In Pylar, go to the project that contains your view.
-
Find Your View: Look for your view in the right sidebar. It should be listed under "Views" or in your project structure.
-
Select the View: Click on your view to select it. Make sure it's highlighted or selected—the AI needs to know which view you're working with.

Why this matters: The AI analyzes your view's structure to generate the right tool. It needs to see what columns are available, what data types they are, and how the view is structured.
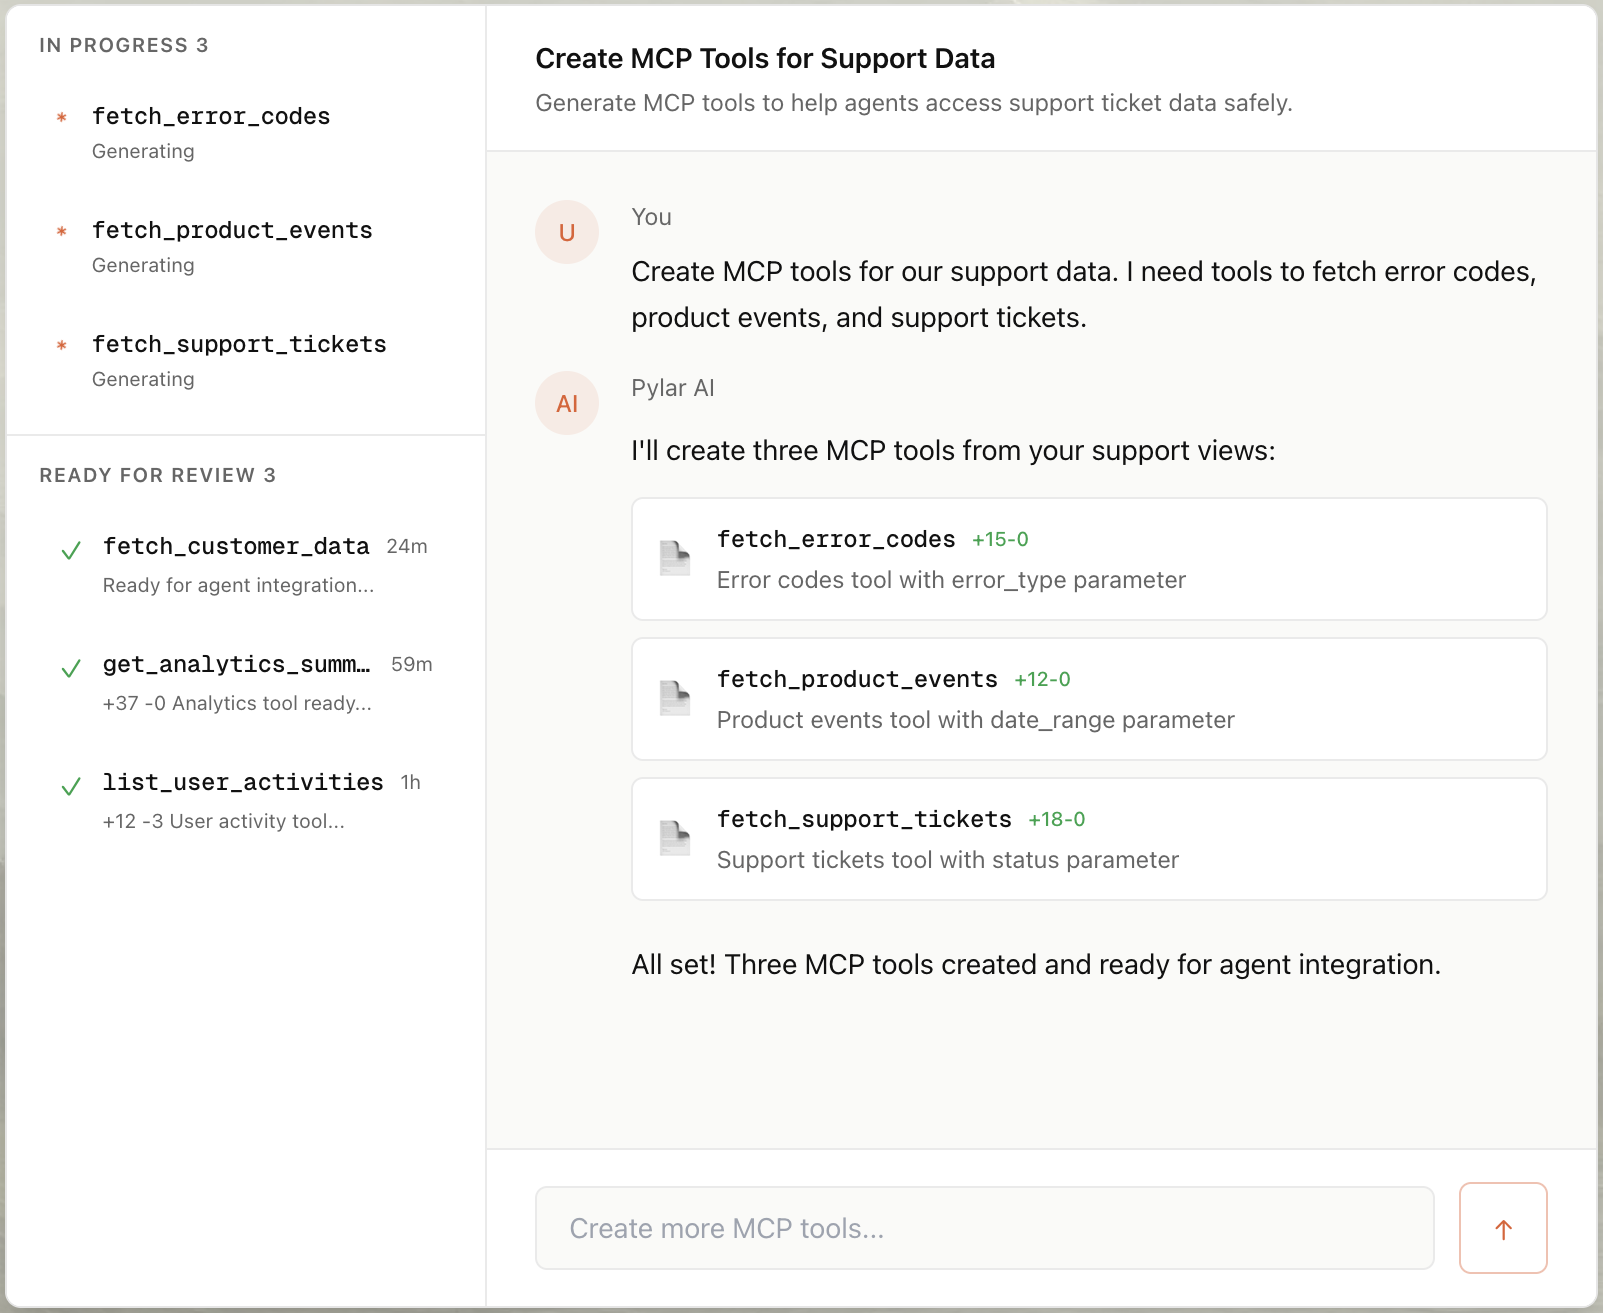
Step 2: Ask the AI to Create a Tool
Once your view is selected, use Pylar's AI to create your tool. This is where it gets fun—you just describe what you want in plain English.
-
Open the AI Assistant: In the right sidebar, you'll see the Pylar AI assistant. It's always available when you have a view selected.
-
Describe What You Want: Type a natural language request describing what the tool should do.
Example requests:
- "Create an MCP tool to get customer information by email"
- "Build a tool that returns active customers ordered by signup date"
- "Make a tool to find customers with high engagement scores"
- Submit Your Request: Click send or press Enter. The AI will analyze your view and generate a complete tool.
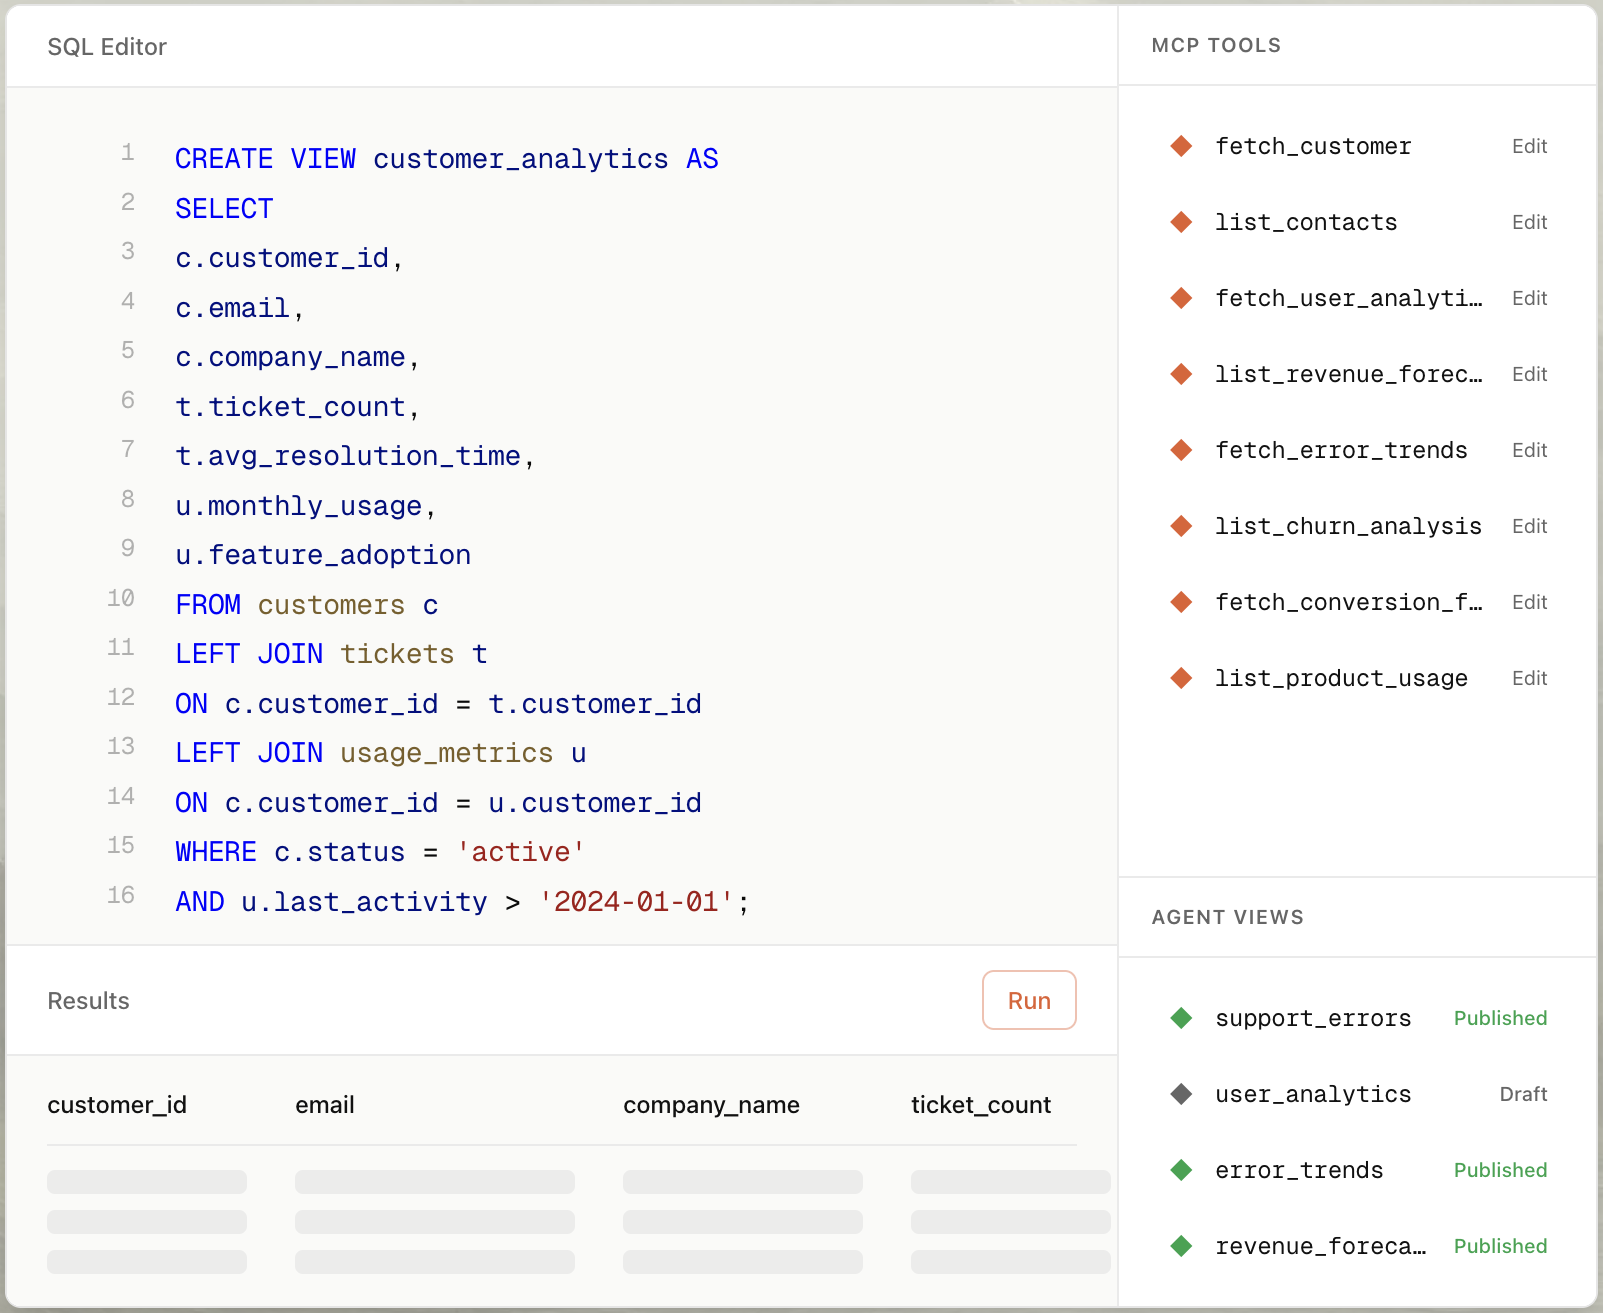
Step 3: Review the Generated Tool
Once the AI finishes generating, your new tool appears in the "MCP Tools" section of the right sidebar. Click on it to see what the AI created.
What you'll see:
- Function Name: A descriptive name like
get_customer_by_emailorfetch_active_customers - Description: What the tool does (this is what agents see)
- SQL Query: The query that retrieves data, with parameter placeholders like
{email}or{customer_id} - Parameters: Inputs the tool accepts (e.g.,
emailas a string) - Tool Call Arguments: Test values you can use to verify it works
Example generated tool:
For a request like "Create a tool to get customer by email", the AI might generate:
- Function Name:
get_customer_by_email - Description: "Fetches customer information filtered by email address"
- SQL Query:
SELECT customer_id, customer_name, email, subscription_status, created_at FROM active_customers_view WHERE email = '{email}' - Parameter:
email(string, required)
The AI uses placeholders like {email} in the query. When an agent calls the tool with email = "customer@example.com", Pylar replaces {email} with the actual value.
Step 4: Test Your Tool
Before publishing, always test your tool. This catches errors early and ensures it works with your actual data.
-
Open the Tool: Click on your tool in the "MCP Tools" section to open its details.
-
Set Test Arguments: In the "Tool Call Arguments" section, enter test values. For example, if your tool needs an email parameter, enter a real email from your data.
-
Click "Test Run": Click the "Test Run" button at the top of the tool view.
-
Review the Results: You'll see:
- The actual SQL query that was executed (with parameters filled in)
- The data returned
- Row count and execution time
- Success or error status
What to check:
- ✅ Does the query execute without errors?
- ✅ Are the results what you expected?
- ✅ Do parameters work correctly?
- ✅ Is the execution time reasonable?
If something looks wrong, you can edit the tool and test again. Don't publish until the test passes.
Step 5: Refine the Tool (Optional)
The AI gives you a great starting point, but you might want to refine it:
Common refinements:
- Adjust the query: Add filters, change sorting, or modify the logic
- Update the description: Make it clearer for agents
- Rename the function: Use a more descriptive name
- Add parameters: Include additional inputs the tool needs
- Remove parameters: Simplify if the tool doesn't need them
To edit a tool:
- Click on the tool in the MCP Tools section
- Click on any component (function name, description, SQL query, etc.)
- Make your changes
- Test again to verify it still works
Pro tip: Start with the AI-generated tool, then refine based on your specific needs. The AI handles the heavy lifting; you just need to fine-tune.
Step 6: Publish Your Tool
Once your tool is tested and working, publish it to make it available to agents.
-
Click "Publish": In the right sidebar, click the "Publish" button.
-
Generate Token: A popup will appear. Click "Generate Token" to create a secure authorization token.
-
Copy Your Credentials: You'll receive two critical values:
- MCP HTTP Stream URL:
https://mcp.publish.pylar.ai/mcp - Authorization Bearer Token:
Bearer eyJhbGciOiJIUzI1NiIsInR5cCI6IkpXVCJ9...
- MCP HTTP Stream URL:

- Store Securely: Copy both values and store them securely. You'll need them to connect your tool to agent builders.
Important: Keep your Bearer Token secret. Never share it publicly or commit it to version control. It provides access to your data.
Real-World Examples
Let me show you how different teams would use this approach in practice.
Example 1: Customer Support Team
A support team has a customer_support_view and needs an agent that can quickly look up customer information when someone calls in.
Tool they create: get_customer_info_by_email
Request to AI: "Create a tool to get customer information by email address"
What the tool does:
- Takes an email as input
- Queries the customer support view
- Returns customer ID, name, subscription status, and last login date
How agents use it: When a customer calls, the support agent asks the AI: "What's the status for customer@example.com?" The AI calls the tool with the email, gets the customer info, and provides a helpful response.
Example 2: Sales Team
A sales team has a customer_sales_view that combines customer data with order history. They want an agent that can help prepare for customer meetings.
Tool they create: get_customer_revenue_summary
Request to AI: "Create a tool to get customer revenue summary including total orders and revenue for a specific customer"
What the tool does:
- Takes a customer ID as input
- Queries the customer sales view
- Returns customer name, total orders, total revenue, and last order date
How agents use it: Before a meeting, the sales rep asks: "Give me a summary for customer 12345." The AI calls the tool, gets the revenue summary, and provides context for the meeting.
Example 3: Product Team
A product team has a user_engagement_view and wants to understand user activity patterns.
Tool they create: get_users_by_engagement_status
Request to AI: "Create a tool to get users filtered by engagement status (active, dormant, or inactive)"
What the tool does:
- Takes an engagement status as input
- Queries the user engagement view
- Returns list of users matching that status with their activity metrics
How agents use it: The product manager asks: "Show me all dormant users." The AI calls the tool, gets the list, and can provide insights about why users might be dormant.
Notice how each tool is tailored to a specific use case. That's the power of tools—you create exactly what each team needs, and agents can use them naturally.
Common Pitfalls & Tips
I've seen teams make these mistakes when building their first tools. Here's how to avoid them.
Pitfall 1: Not Testing Before Publishing
This is the biggest mistake. I've seen teams publish tools that fail in production because they never tested them.
Why this matters: A tool that fails when an agent calls it creates a bad experience. The agent returns an error, the user gets frustrated, and you have to debug in production.
How to avoid it: Always test your tools before publishing. Use the "Test Run" button with realistic data values. Verify the results match what you expect.
Pitfall 2: Vague Tool Descriptions
Agents rely on tool descriptions to decide when to use them. A vague description means agents won't use your tool correctly.
Bad example: "Gets data" or "Returns information"
Good example: "Fetches customer information including subscription status and last login date, filtered by email address"
Why this matters: Agents need to understand what your tool does and when to use it. A clear description helps them make the right decision.
Pitfall 3: Parameter Name Mismatches
Your SQL query uses placeholders like {email}, and your parameters must match exactly.
Wrong:
- Parameter name:
customer_email - SQL:
WHERE email = '{email}'❌
Right:
- Parameter name:
email - SQL:
WHERE email = '{email}'✅
Why this matters: If the parameter name doesn't match the placeholder, the tool will fail. Always double-check that parameter names match exactly.
Pitfall 4: Not Handling Edge Cases
What happens if an agent calls your tool with an empty string? Or a value that doesn't exist? Or NULL?
How to handle it:
- Add validation in your SQL (e.g.,
WHERE email IS NOT NULL AND email != '') - Use appropriate operators (LIKE for partial matches, = for exact matches)
- Consider what should happen when no results are found
Why this matters: Agents will call your tools with various inputs. Your tools should handle edge cases gracefully, not crash.
Pitfall 5: Overly Complex Tools
Keep tools focused on one thing. Don't try to make a tool that does everything.
Bad: A tool that can filter by email, date range, status, region, and product category all at once.
Good: Separate tools for different use cases:
get_customer_by_emailget_customers_by_date_rangeget_customers_by_status
Why this matters: Simple, focused tools are easier for agents to understand and use correctly. Complex tools confuse agents and lead to errors.
Best Practices Summary
Here's a quick checklist for building good tools:
- ✅ Test before publishing: Always verify tools work with real data
- ✅ Write clear descriptions: Help agents understand what your tool does
- ✅ Match parameter names: Ensure SQL placeholders match parameter names exactly
- ✅ Handle edge cases: Consider empty strings, NULLs, and missing data
- ✅ Keep tools focused: One tool, one purpose
- ✅ Use descriptive names: Function names should indicate what the tool does
- ✅ Start with AI: Let the AI generate the tool, then refine it
Next Steps
You've built your first MCP tool. That's the bridge between your data and AI agents. Now you can:
-
Create more tools: Build additional tools for different use cases or different views.
-
Connect to agents: Publish your tools and connect them to your agent builder. The next tutorial will walk you through this.
-
Monitor usage: Once agents start using your tools, use Evals to see how they're being used and identify areas for improvement.
-
Iterate: Tools aren't set in stone. As you learn how agents use them, you can refine them to better match their needs.
The key is to start simple and iterate. Your first tool doesn't need to be perfect—it just needs to work. You can always refine it later based on real usage.
If you want to keep going, the next step is publishing your tool and connecting it to an agent builder. That's where the magic happens—turning your governed d
Frequently Asked Questions
Do I need to know SQL to create tools?
Not really. Pylar's AI can generate tools from natural language, so you can create tools without writing SQL. However, if you want to refine or customize tools, basic SQL knowledge helps. The AI gives you a great starting point; you just need to fine-tune.
Can I create multiple tools on the same view?
Absolutely! In fact, this is a best practice. Create different tools for different use cases. For example, on a customer view, you might have:
get_customer_by_id- Fetch a specific customerget_customer_by_email- Find by emailget_high_value_customers- Filter by revenue threshold
Each tool queries the same view but serves a different purpose.
What if the AI generates a tool that doesn't work?
Test it first. If it doesn't work, you can edit the tool manually. Click on the SQL query, modify it, and test again. The AI gives you a starting point, but you can always refine it.
How do I know if my tool description is good enough?
Ask yourself: "If I were an AI agent, would I understand when to use this tool?" If the answer is yes, your description is probably good. If not, make it more specific. Include what data is returned, what parameters are needed, and any important behaviors.
Can I update a tool after publishing?
Yes! You can edit tools anytime. Changes reflect automatically—no need to republish. This is one of the benefits of the tools approach: you can iterate and improve without redeploying.
What if my tool needs multiple parameters?
That's fine. Just define all the parameters in the tool configuration, and use placeholders in your SQL query. For example:
Parameters: customer_id (string), start_date (string), end_date (string)
SQL:
SELECT *
FROM customer_orders_view
WHERE customer_id = '{customer_id}'
  AND order_date >= '{start_date}'
  AND order_date <= '{end_date}'
The AI can generate tools with multiple parameters, or you can add them manually.
How do I connect my published tool to an agent builder?
Once you publish, you get an MCP HTTP Stream URL and Bearer Token. You paste these into your agent builder (OpenAI, LangGraph, Claude Desktop, etc.). The exact steps depend on which agent builder you're using. We'll cover this in detail in the next tutorial: "How to Publish a Pylar Tool to the OpenAI Agent Builder."