Hoshang Mehta
How to Build MCP Tools Without Coding
Most teams think building MCP tools requires writing code. You need to understand the Model Context Protocol spec, write server implementations, handle authentication, manage deployments. It's a lot of work—especially if you're a data team that just wants to give agents access to your data.
But here's what I've learned: you don't need to code to build MCP tools. There are several ways to create them, and the simplest approach takes under 2 minutes.
This guide shows you three ways to build MCP tools, from most complex to simplest. Whether you're a developer who wants full control or a data analyst who just wants to get things done, you'll find an approach that works.
Table of Contents
- What Are MCP Tools?
- Why Build MCP Tools?
- Method 1: Manual Coding (Full Control)
- Method 2: Template-Based Tools (Faster, Still Technical)
- Method 3: Pylar (No Coding Required)
- Comparing the Three Methods
- Real-World Example: Building a Customer Health Tool
- Common Mistakes to Avoid
- Where Pylar Fits In
- Frequently Asked Questions
What Are MCP Tools?
MCP (Model Context Protocol) tools are functions that AI agents can call to access data or perform actions. Think of them as APIs designed specifically for agents.
Traditional API:
Application → REST API → Database
MCP Tool:
Agent → MCP Tool → Database
MCP tools are different from REST APIs in a few key ways:
- Agent-Native: Designed for how agents work, not applications
- Natural Language Descriptions: Tools describe themselves in plain English
- Structured Parameters: Clear input/output schemas
- Framework-Agnostic: Work with any MCP-compatible framework (Claude, LangChain, OpenAI, n8n, etc.)
What MCP Tools Look Like
Here's a simple MCP tool:
{
  "name": "get_customer_info",
  "description": "Get customer information including name, email, plan, and subscription status",
  "inputSchema": {
    "type": "object",
    "properties": {
      "email": {
        "type": "string",
        "description": "Customer email address"
      }
    },
    "required": ["email"]
  }
}
When an agent needs customer information, it calls this tool with an email address. The tool queries your database and returns the customer data.
Why Build MCP Tools?
MCP tools are the bridge between your data and AI agents. Without tools, agents can't reliably access your data. With tools, agents can answer questions, provide context, and make decisions based on real information.
The Problem Without Tools
Without MCP tools, agents have two bad options:
-
Direct database access: Agents write SQL queries themselves. This is risky—they might:
- Access sensitive data
- Write inefficient queries
- Violate compliance requirements
- Crash production databases
-
REST APIs: Agents call REST endpoints. This is rigid—APIs expose fixed endpoints with fixed schemas. New questions require new endpoints.
The Solution With Tools
With MCP tools, you get:
- Governed Access: Tools query through sandboxed views, not raw databases
- Flexible Querying: Tools can answer different questions with the same view
- Agent-Friendly: Natural language descriptions help agents use tools correctly
- Framework-Agnostic: One tool works with Claude, LangChain, OpenAI, n8n, etc.
MCP tools are how you give agents secure, flexible access to your data.
Method 1: Manual Coding (Full Control)
If you want complete control over your MCP tools, you can build them from scratch. This requires understanding the MCP specification and writing server code.
What You Need
- Understanding of MCP protocol
- Server implementation (Node.js, Python, etc.)
- Authentication handling
- Database connection management
- Deployment infrastructure
Step-by-Step: Building an MCP Tool Manually
Step 1: Set Up MCP Server
Create a server that implements the MCP protocol:
// mcp-server.ts
import { Server } from "@modelcontextprotocol/sdk/server/index.js";
import { StdioServerTransport } from "@modelcontextprotocol/sdk/server/stdio.js";

const server = new Server({
  name: "customer-tools",
  version: "1.0.0",
}, {
  capabilities: {
    tools: {},
  },
});
Step 2: Define Tool
Define your tool with name, description, and parameters:
server.setRequestHandler(ListToolsRequestSchema, async () => ({
  tools: [
    {
      name: "get_customer_info",
      description: "Get customer information including name, email, plan, and subscription status",
      inputSchema: {
        type: "object",
        properties: {
          email: {
            type: "string",
            description: "Customer email address",
          },
        },
        required: ["email"],
      },
    },
  ],
}));
Step 3: Implement Tool Logic
Write the code that executes when the tool is called:
server.setRequestHandler(CallToolRequestSchema, async (request) => {
  if (request.params.name === "get_customer_info") {
    const email = request.params.arguments?.email;

    // Validate input
    if (!email || typeof email !== "string") {
      throw new Error("Email is required");
    }

    // Query database
    const query = "SELECT * FROM customer_support_view WHERE email = $1";
    const result = await db.query(query, [email]);

    return {
      content: [
        {
          type: "text",
          text: JSON.stringify(result.rows[0]),
        },
      ],
    };
  }
});
Step 4: Handle Authentication
Implement authentication for secure access:
// Add API key validation
const apiKey = request.headers["authorization"]?.replace("Bearer ", "");
if (!apiKey || !isValidApiKey(apiKey)) {
  throw new Error("Unauthorized");
}
Step 5: Deploy Server
Deploy your MCP server to infrastructure:
- Set up hosting (AWS, GCP, Azure)
- Configure environment variables
- Set up monitoring and logging
- Handle scaling and reliability
Pros and Cons
Pros:
- Complete control over implementation
- Can customize everything
- No vendor dependencies
Cons:
- Requires coding knowledge
- Time-consuming (days to weeks)
- Need to maintain infrastructure
- Must handle security, scaling, monitoring yourself
Time to build: 1-2 weeks for a basic tool Ongoing maintenance: 20-30% of engineering time
Method 2: Template-Based Tools (Faster, Still Technical)
Some tools provide templates or generators that help you build MCP tools faster. You still write code, but less of it.
What You Need
- Basic coding knowledge
- Understanding of your data structure
- Template or generator tool
Step-by-Step: Using Templates
Step 1: Choose a Template Tool
Tools like MCP Studio or LangChain's MCP builder provide templates:
npm install -g mcp-studio
mcp-studio create-tool --template customer-info
Step 2: Fill in Template
Edit the generated template with your specifics:
// Generated template
export const getCustomerInfo = {
  name: "get_customer_info",
  description: "YOUR_DESCRIPTION_HERE", // Fill this in
  inputSchema: {
    // Generated schema - customize as needed
  },
  handler: async (args) => {
    // Generated handler - add your query logic
    const query = "YOUR_QUERY_HERE";
    return await db.query(query, args);
  },
};
Step 3: Test Tool
Test the tool locally:
mcp-studio test-tool get_customer_info --email "customer@example.com"
Step 4: Deploy
Deploy using the tool's deployment command:
mcp-studio deploy --server-url "https://api.example.com/mcp"
Pros and Cons
Pros:
- Faster than manual coding
- Less boilerplate to write
- Some tooling support
Cons:
- Still requires coding
- Limited customization
- Need to understand templates
- Deployment complexity remains
Time to build: 2-4 hours for a basic tool Ongoing maintenance: 10-20% of engineering time
Method 3: Pylar (No Coding Required)
Pylar lets you build MCP tools from natural language. No coding, no templates, no deployment complexity. Just describe what you want, and Pylar creates the tool.
What You Need
- A Pylar account (sign up at pylar.ai)
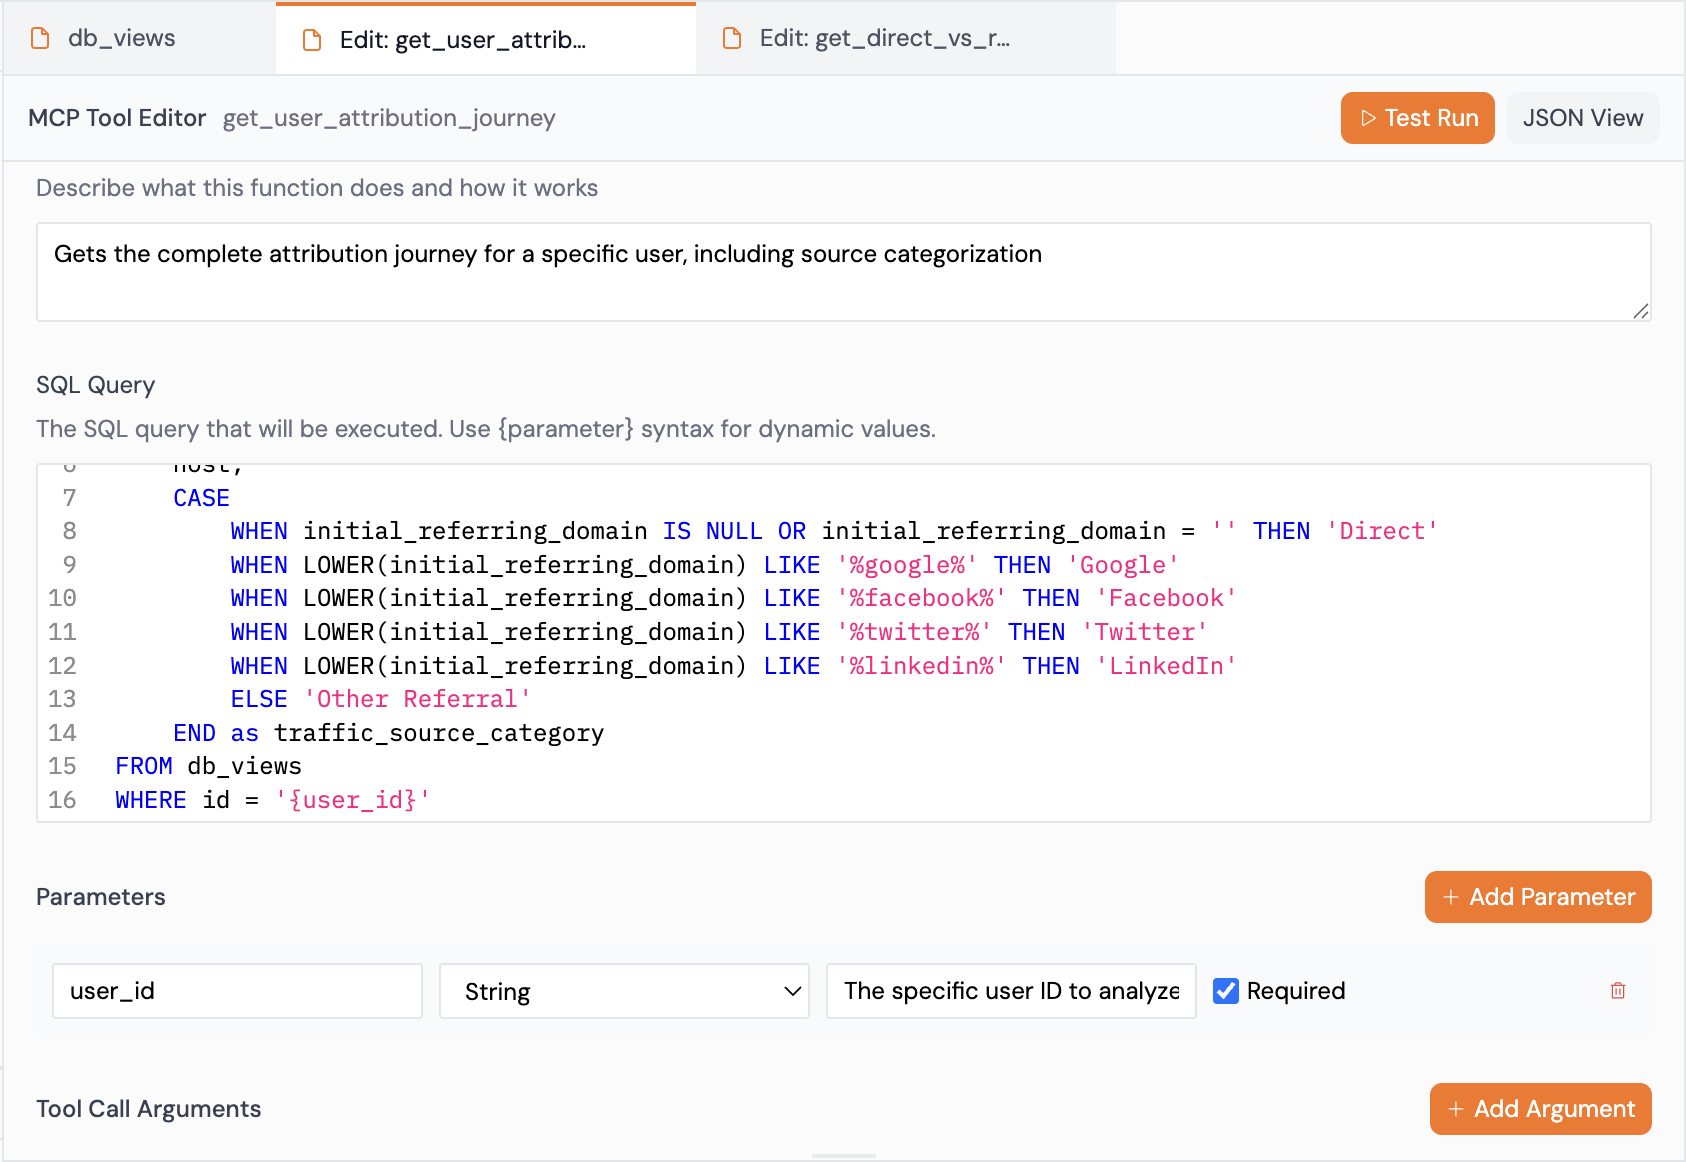
- A data view (SQL view that defines what data agents can access)
- 2 minutes
Step-by-Step: Building an MCP Tool with Pylar
Step 1: Create a Data View
First, create a SQL view that defines what data the tool can access:

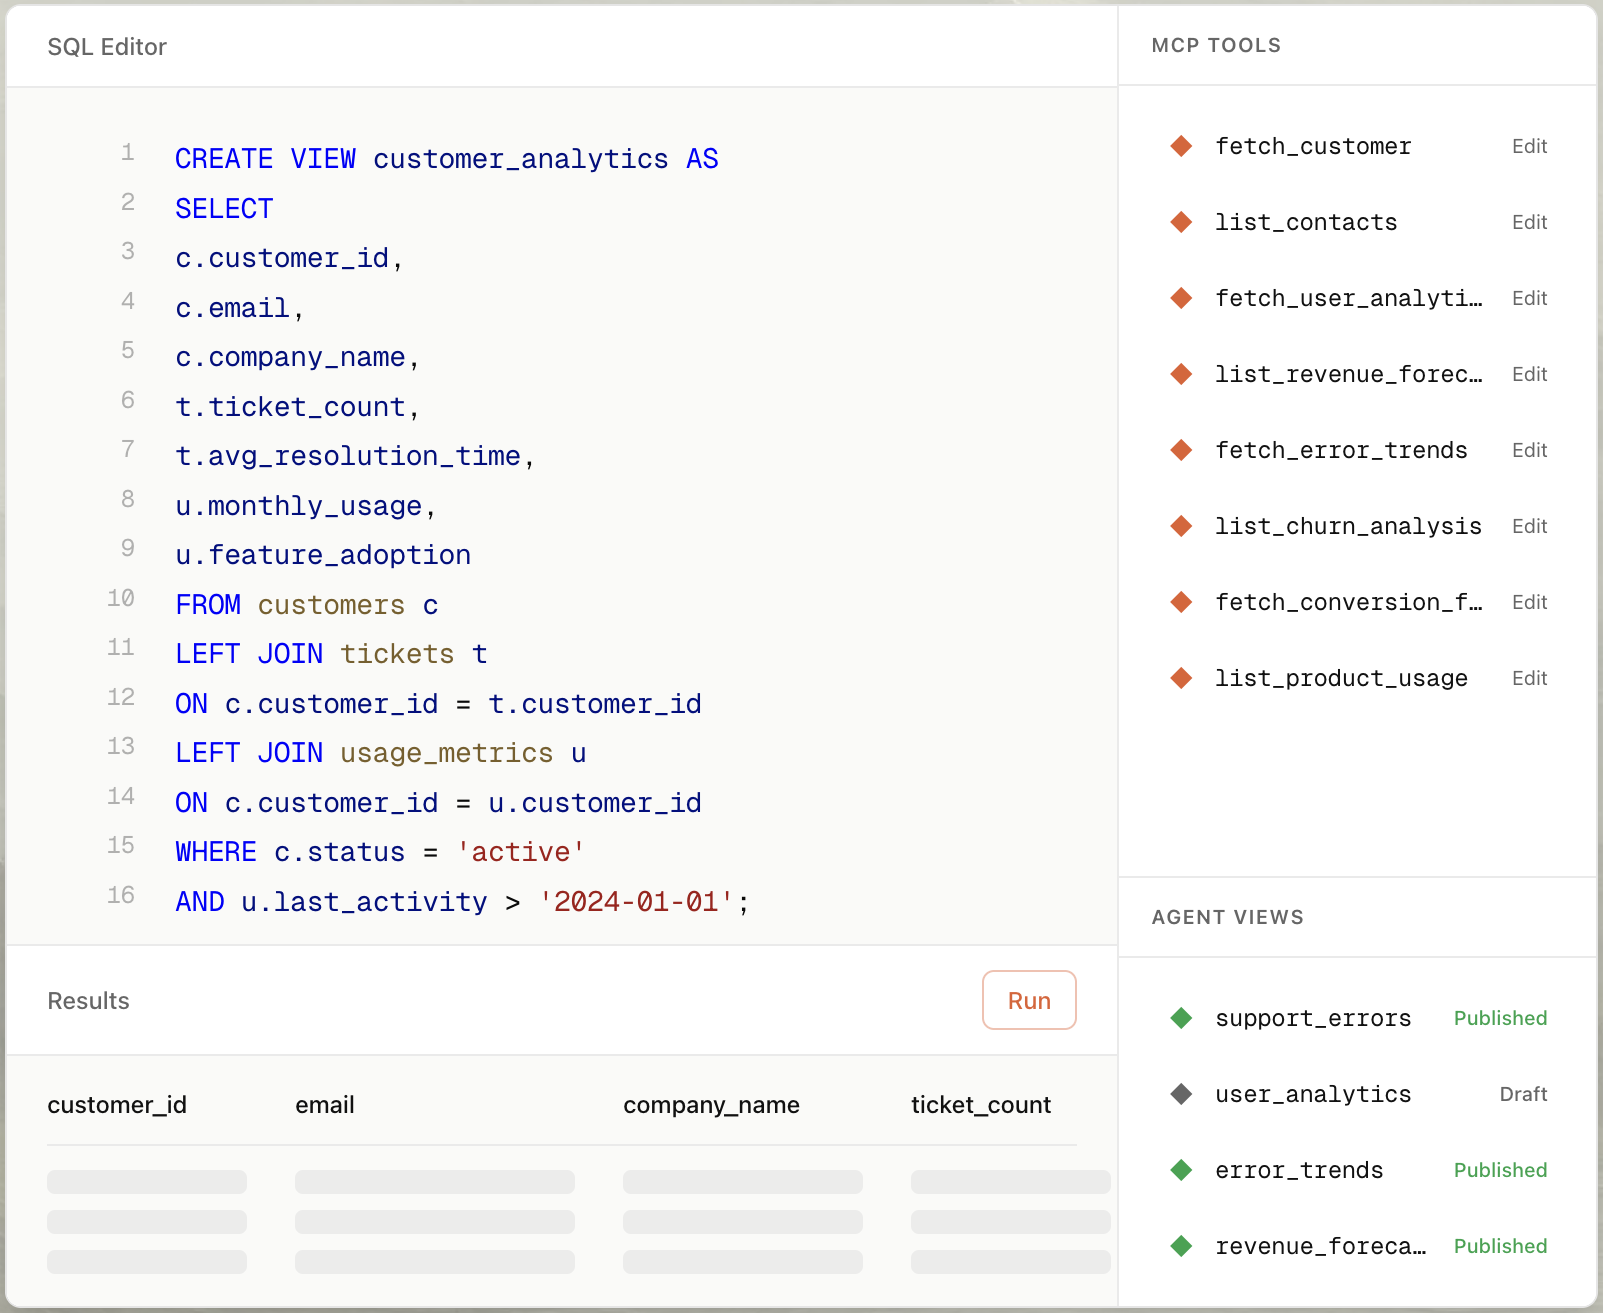
In Pylar's SQL IDE, write a view:
-- Customer Support View
SELECT
  customer_id,
  customer_name,
  email,
  plan_name,
  subscription_status,
  last_login_date,
  active_users_30d,
  open_tickets
FROM customers
WHERE is_active = true
  AND signup_date >= DATE_SUB(CURRENT_DATE(), INTERVAL 2 YEAR);
This view defines exactly what data agents can access. No sensitive fields, filtered rows, compliance built in.
Step 2: Create MCP Tool from Natural Language
Open Pylar's MCP tool builder and describe what you want:
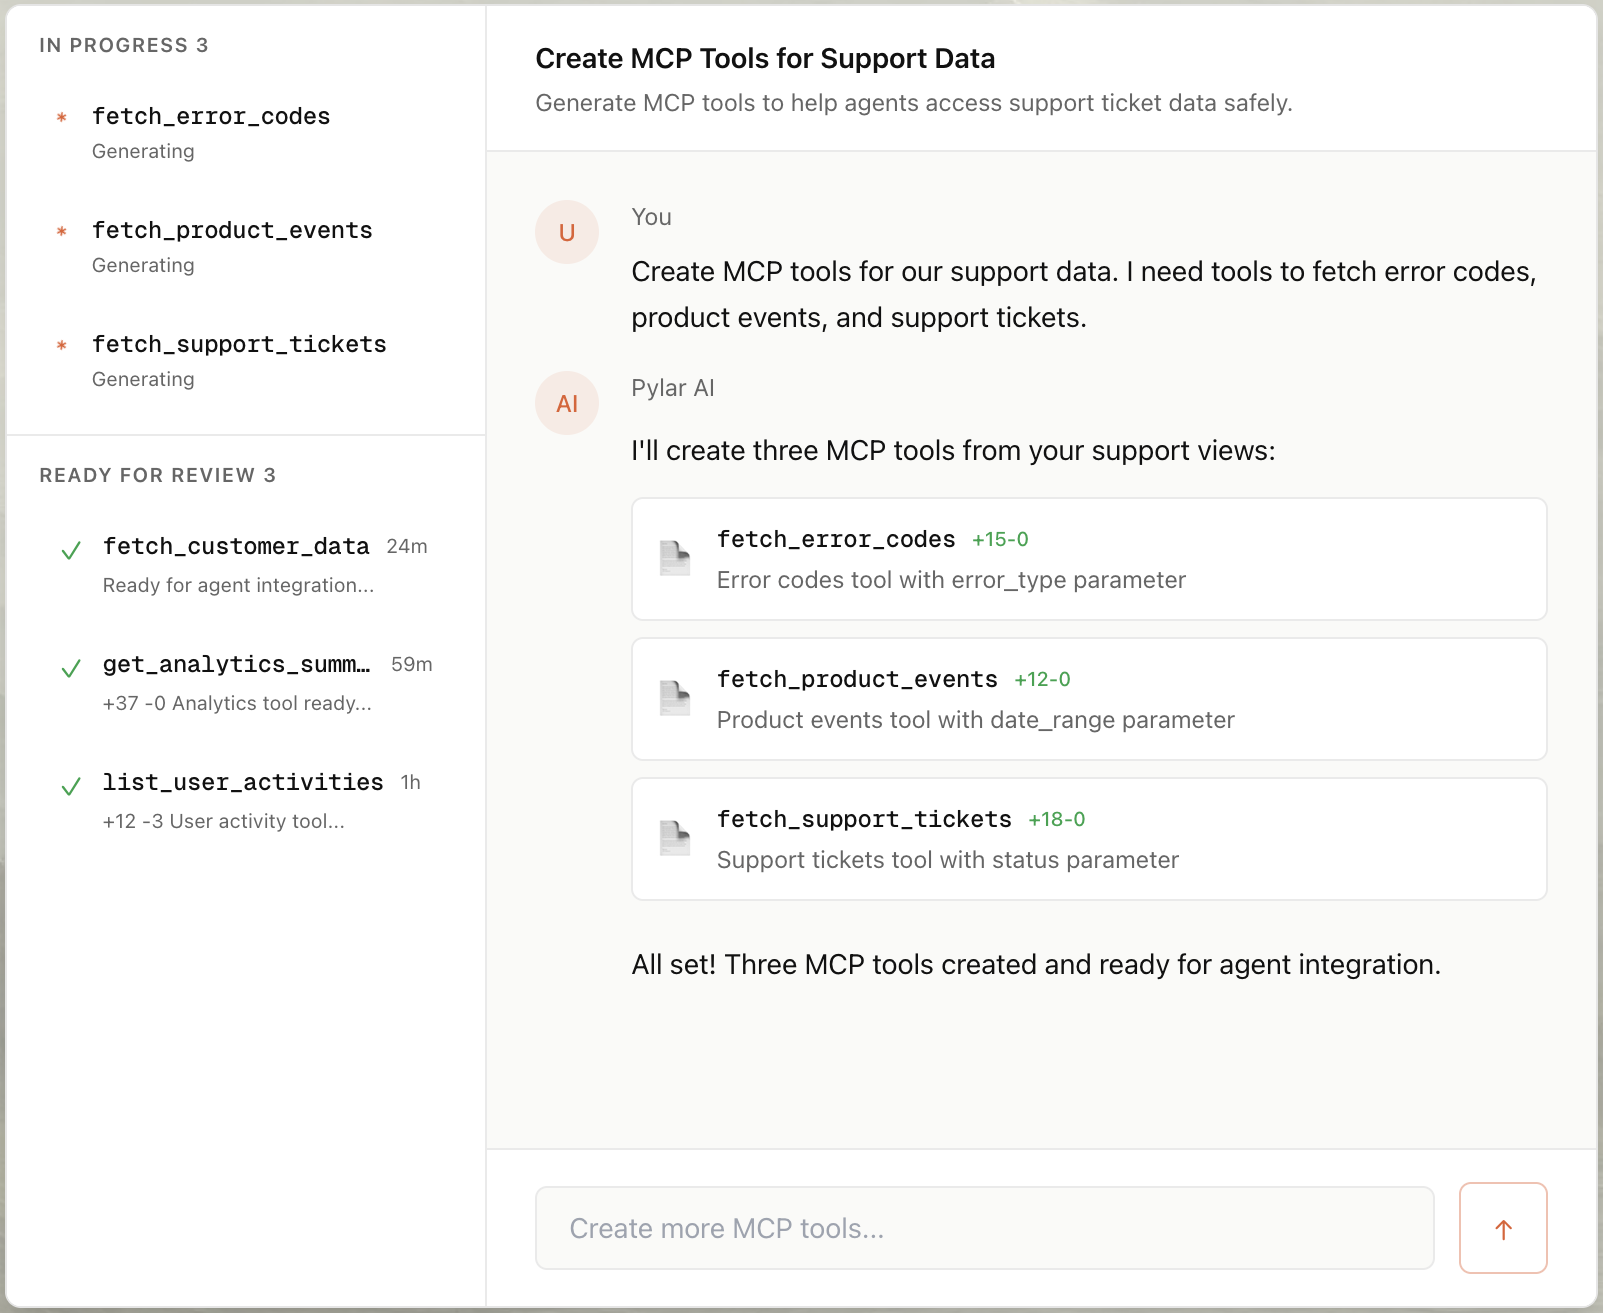
You type: "Create a tool that gets customer information for support context. It should take a customer email as input and return customer details, subscription status, recent usage, and open tickets."
Pylar generates:
- Tool name:
get_customer_info - Description: "Get customer information for support context. Returns customer details, subscription status, recent usage, and open tickets."
- Parameters:
email(string, required) - Query: Automatically queries your
customer_support_view
Time: Under 2 minutes.
Step 3: Test the Tool
Test the tool right in Pylar:
Enter a test email, click "Test", and see the results. Verify it returns the right data, handles errors correctly, and performs well.
Step 4: Publish
Click "Publish" to make the tool available:

Pylar generates:
- MCP server URL
- Authorization token
- Connection instructions for any framework
Step 5: Connect to Your Agent
Paste the credentials into your agent framework:
Claude Desktop:
{
  "mcpServers": {
    "pylar": {
      "url": "https://api.pylar.ai/mcp/your-server-id",
      "apiKey": "your-bearer-token"
    }
  }
}
LangGraph:
from langchain.tools import MCPTool

tool = MCPTool(
    name="get_customer_info",
    server_url="https://api.pylar.ai/mcp/your-server-id",
    api_key="your-bearer-token"
)
agent.add_tool(tool)
OpenAI Agent Builder: Paste the URL and token in the MCP configuration.
n8n/Zapier: Use the MCP node with your credentials.
That's it. Your tool is live and agents can use it.
Pros and Cons
Pros:
- No coding required
- Fast (under 2 minutes)
- Built-in governance (views enforce security)
- Automatic deployment (no infrastructure to manage)
- Framework-agnostic (works with any MCP framework)
- Monitoring included (Pylar Evals tracks usage)
Cons:
- Requires Pylar account (free tier available)
- Less customization than manual coding (but covers 95% of use cases)
Time to build: Under 2 minutes Ongoing maintenance: None (Pylar handles it)
Comparing the Three Methods
Here's how the three methods compare:
| Factor | Manual Coding | Template Tools | Pylar |
|---|---|---|---|
| Coding Required | Yes (full implementation) | Yes (template editing) | No (natural language) |
| Time to Build | 1-2 weeks | 2-4 hours | Under 2 minutes |
| Technical Skill | High (MCP spec, server dev) | Medium (basic coding) | Low (SQL knowledge) |
| Deployment | Manual (infrastructure setup) | Manual (deployment config) | Automatic (one click) |
| Security | You build it | You build it | Built-in (sandboxed views) |
| Monitoring | You build it | You build it | Built-in (Pylar Evals) |
| Maintenance | High (20-30% engineering time) | Medium (10-20% time) | None (Pylar handles) |
| Framework Support | You implement | Template-dependent | All MCP frameworks |
| Cost | Engineering time | Engineering time + tool cost | Platform cost (free tier) |
When to Use Each Method
Use Manual Coding When:
- You need complete control over implementation
- You have specific requirements templates can't handle
- You have engineering resources to build and maintain
Use Template Tools When:
- You want faster development than manual coding
- You're comfortable with code but want some help
- You need more customization than Pylar provides
Use Pylar When:
- You want the fastest path to working tools
- You're a data team, not an engineering team
- You want built-in security and governance
- You need tools that work across multiple frameworks
- You want zero maintenance burden
For most teams, Pylar is the right choice. It's the fastest, safest, and most maintainable option.
Real-World Example: Building a Customer Health Tool
Let me show you how to build the same tool using each method:
The Goal
Build an MCP tool that returns customer health status, including:
- Customer name, email, plan
- Recent usage (last 30 days)
- Open support tickets
- Risk signals (usage drop, payment issues)
Method 1: Manual Coding
Time: 1-2 weeks
Steps:
- Set up MCP server infrastructure (2-3 days)
- Write tool definition (1 day)
- Implement query logic (2-3 days)
- Add authentication (1 day)
- Add error handling (1 day)
- Deploy and test (2-3 days)
- Set up monitoring (1-2 days)
Code written: ~500 lines Infrastructure: Server, database connections, auth system, monitoring
Method 2: Template Tools
Time: 2-4 hours
Steps:
- Install template tool (15 minutes)
- Generate template (5 minutes)
- Fill in tool description and parameters (30 minutes)
- Write SQL query (1 hour)
- Test locally (30 minutes)
- Deploy (1 hour)
Code written: ~100 lines Infrastructure: Still need deployment setup
Method 3: Pylar
Time: Under 2 minutes
Steps:
-
Create view (if you don't have one already):
CREATE VIEW customer_health_view AS SELECT customer_id, customer_name, email, plan_name, active_users_30d, open_tickets, CASE WHEN login_frequency < 0.5 THEN 'high_risk' WHEN open_tickets > 5 THEN 'high_risk' ELSE 'healthy' END as health_status FROM customers WHERE is_active = true; -
Describe tool in natural language: "Create a tool that gets customer health status. It should take a customer email and return customer details, usage metrics, open tickets, and health status."
-
Publish (one click)
Code written: 0 lines Infrastructure: None (Pylar handles it)
Result: Same tool, 99% less time, zero maintenance.
Common Mistakes to Avoid
Here are mistakes I've seen teams make when building MCP tools:
Mistake 1: Building Tools Before Creating Views
What happens: Teams build tools that query raw database tables directly.
Why it's a problem: No governance, security risks, compliance issues.
The fix: Always create sandboxed views first. Tools query views, not tables.
Mistake 2: Over-Engineering Tools
What happens: Teams build complex tools with many parameters, conditional logic, and edge cases.
Why it's a problem: Complex tools are hard to use, hard to maintain, and agents struggle with them.
The fix: Start simple. One tool, one purpose. Add complexity only when needed.
Mistake 3: Skipping Testing
What happens: Teams deploy tools without testing them thoroughly.
Why it's a problem: Tools fail in production, agents get wrong data, users lose trust.
The fix: Test every tool before deploying. Test with real data, test error cases, test edge cases.
Mistake 4: Not Monitoring Usage
What happens: Teams deploy tools and don't monitor how agents use them.
Why it's a problem: Can't identify problems, can't optimize, can't improve.
The fix: Monitor tool usage from day one. Track success rates, errors, query patterns, costs.
Mistake 5: Building One Tool Per Question
What happens: Teams build a new tool for every question agents need to answer.
Why it's a problem: Tool sprawl, maintenance burden, inconsistent governance.
The fix: Build flexible tools that can answer multiple questions. Use parameters to handle variations.
Where Pylar Fits In
Pylar is the simplest and safest way to build MCP tools. Here's why:
No Coding Required: Describe what you want in natural language, and Pylar creates the tool. No MCP spec knowledge needed, no server code to write, no deployment to manage.
Built-in Security: Tools query through sandboxed views you create in Pylar's SQL IDE. Views enforce access boundaries, filter sensitive data, and ensure compliance. Agents can't access data outside of views.
Automatic Deployment: Click "Publish" and your tool is live. Pylar handles hosting, scaling, authentication, and reliability. No infrastructure to manage.
Framework-Agnostic: Pylar tools work with any MCP-compatible framework. Build once, use everywhere—Claude Desktop, LangGraph, OpenAI, n8n, Zapier, Make, and more.
Monitoring Included: Pylar Evals gives you visibility into how agents use your tools. Track success rates, errors, query patterns, and costs. Get alerts when something looks wrong.
Self-Service: Data teams can build tools without engineering bottlenecks. No API development, no deployment pipelines, no infrastructure management.
Try Pylar free: Sign up at pylar.ai to build your first MCP tool in under 2
Frequently Asked Questions
Do I need to know the MCP specification to use Pylar?
No. Pylar handles all MCP protocol details for you. You just describe what you want in natural language, and Pylar creates the tool with proper MCP formatting.
Can I customize Pylar-generated tools?
Yes. After Pylar generates a tool, you can:
- Edit the description
- Modify parameters
- Adjust the query
- Add validation rules
But for most use cases, Pylar's generated tools work perfectly as-is.
What if I need a tool that Pylar can't generate?
Pylar can generate tools for any SQL view you create. If you can express your need as a SQL query, Pylar can create a tool for it. For edge cases that require custom logic, you can still use manual coding or template tools.
How do Pylar tools compare to manually coded tools?
Pylar tools are functionally equivalent to manually coded tools. They:
- Follow the same MCP specification
- Support the same frameworks
- Provide the same security (through sandboxed views)
- Offer the same flexibility (through SQL views)
The difference is speed and maintenance: Pylar tools take minutes to build and require zero maintenance.
Can I use Pylar tools with my existing MCP tools?
Yes. Pylar tools are standard MCP tools. They work alongside any other MCP tools you have. You can mix Pylar tools with manually coded tools, template-generated tools, or tools from other platforms.
What happens if I need to update a Pylar tool?
Update the tool in Pylar's interface. Changes are automatically available to all connected agents—no redeployment needed. This is one of Pylar's key advantages: iterate quickly without deployment complexity.
How do I know if my Pylar tools are working?
Pylar Evals shows you:
- Success rates (how often tools succeed vs. fail)
- Error patterns (what errors occur and why)
- Query performance (latency, cost)
- Usage patterns (which tools are used most)
Use this data to optimize your tools and improve agent performance.
Can I build tools that don't query databases?
Pylar is designed for data access tools (querying databases, warehouses, SaaS tools). For tools that perform actions (send emails, create records, etc.), you might need manual coding or other platforms. But for data access—which is what most agents need—Pylar is the fastest option.
You don't need to code to build MCP tools. Pylar lets you create them from natural language in under 2 minutes, with built-in security, automatic deployment, and zero maintenance. Try it free at pylar.ai.
If you're building AI agents that need data access, start with Pylar. It's the simplest and safest way to build MCP tools.