Hoshang Mehta
How to Build a Full Internal Agent Workflow in Under 1 Hour
You've read the tutorials on connecting data sources, creating views, and building MCP tools. Now it's time to connect all the dots and get a working agent running end to end. This guide will walk you through building a complete internal agent workflow in under 60 minutes.
This end-to-end tutorial ties everything together: connecting a data source, creating a view, building an MCP tool, publishing it, connecting to an agent builder, and testing it. By the end, you'll have a working agent that can answer questions about your data. No shortcuts, no assumptions—just a complete workflow you can follow.
Here's What We'll Build
We'll build a Customer Support Agent that can answer questions about customers, orders, and support tickets. This agent will:
- Answer questions like "What's the status of customer 12345?"
- Look up customer information by ID or email
- Provide order history and customer health status
- Help support teams get instant customer context
Example interactions:
- "Get customer information for customer ID 12345"
- "What's the status of customer@example.com?"
- "Show me customers who haven't placed an order in 90 days"
This is a practical use case that most teams can relate to, and you can adapt it to your specific needs.
Why This Approach Works
Before we start, let me explain why building a complete workflow matters and how it fits into Pylar's approach.
How This Fits into the Bigger Picture
This tutorial ties together Pylar's "Data → Views → Tools → Agents" flow:
- Data: Connect your data source (10 minutes)
- Views: Create a governed SQL view (15 minutes)
- Tools: Build an MCP tool on your view (10 minutes)
- Publish: Generate credentials and publish (5 minutes)
- Agents: Connect to an agent builder (10 minutes)
- Test: Verify everything works (5 minutes)
- Monitor: Set up Evals (5 minutes)
Total: 60 minutes from data source to working agent.
The key insight: Each step builds on the previous one. You can't skip steps—you need the complete workflow to have a working agent.
Prerequisites
Before we start, make sure you have:
- ✅ A Pylar account (sign up at app.pylar.ai if you don't have one)
- ✅ Access to at least one data source (Postgres, MySQL, BigQuery, Snowflake, or any supported database)
- ✅ Database credentials (host, database name, username, password)
- ✅ Ability to whitelist IP addresses (for databases/warehouses)
- ✅ An agent builder account (OpenAI Platform, Claude Desktop, Cursor, or any MCP-compatible builder)
- ✅ 60 minutes of focused time
Important: If you don't have database credentials or can't whitelist IPs, invite a team member who can help with the connection step.
The Complete Workflow (60 Minutes)
Step 1: Connect Your Data Source (10 minutes)
First, let's connect Pylar to your database. I'll use Postgres as an example, but the process is similar for other databases.
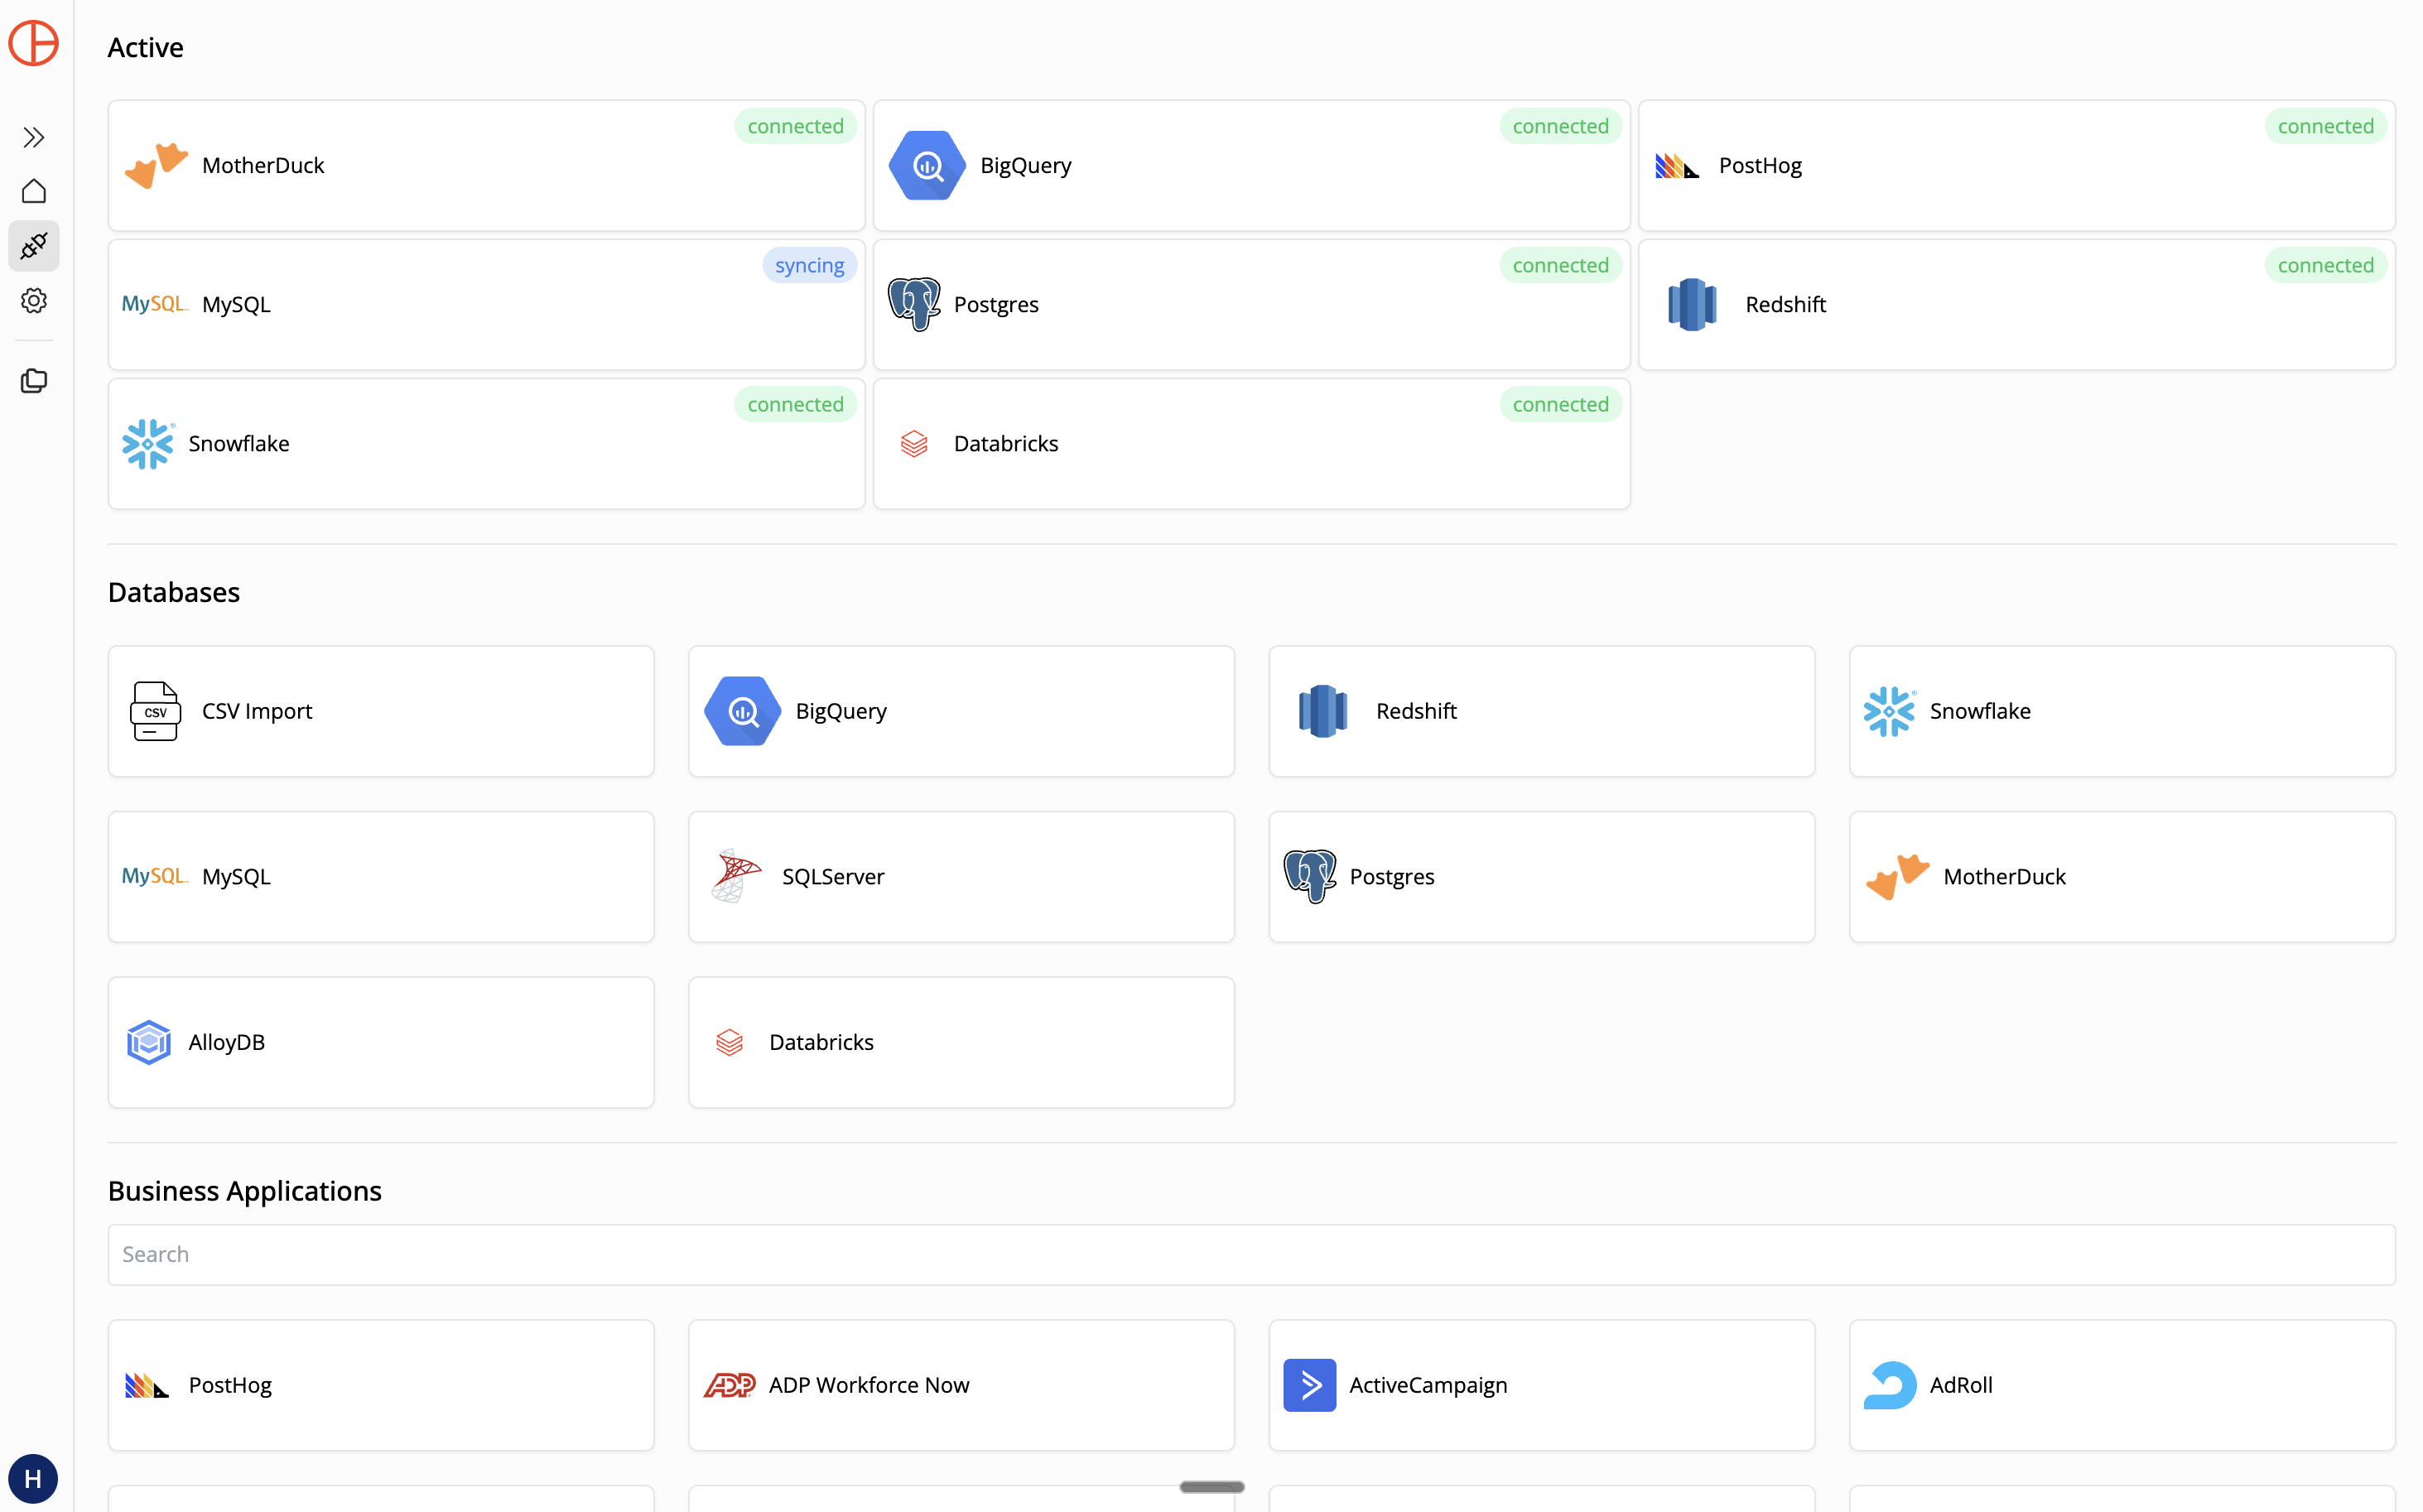
1.1: Navigate to Connections
- Log in to Pylar: Go to app.pylar.ai and sign in (or sign up if you don't have an account)
- Open Connections: Click "Connections" in the left sidebar
- Select Database Type: Click on PostgreSQL (or your database type)

1.2: Enter Connection Details
Fill in your database credentials:
- Host: Your Postgres hostname or IP (e.g.,
db.example.comor192.168.1.100) - Port:
5432(or your custom port) - Database Name: The database you want to connect (e.g.,
production,analytics) - Username: Your Postgres username
- Password: Your Postgres password
1.3: Whitelist Pylar IP
Critical: Before submitting, whitelist Pylar's IP address: 34.122.205.142
For cloud-hosted Postgres:
- AWS RDS: Add inbound rule allowing PostgreSQL (port 5432) from
34.122.205.142 - Google Cloud SQL: Add authorized network
34.122.205.142/32 - Azure Database: Add client IP
34.122.205.142in firewall settings
For self-hosted Postgres: Edit pg_hba.conf and add:
host all all 34.122.205.142/32 md5
Then reload: sudo systemctl reload postgresql
1.4: Test and Save
- Click "Submit" to test the connection
- If successful, give it a schema name (e.g.,
postgres_production) - Save the connection
Time check: You should be at ~10 minutes. If the connection fails, check your credentials and IP whitelisting.
Step 2: Create a Project (2 minutes)
Projects organize your views and tools.
- Click "Create Project": From the dashboard, click "Create Project"
- Name it: Give it a descriptive name (e.g., "Customer Support Agent")
- Add description (optional): "Internal agent for customer support queries"
- Click "Create"
Time check: ~12 minutes total.
Step 3: Create Your First View (15 minutes)
Now let's create a view that combines customer and order data. This view will be what the agent queries.
3.1: Open the SQL IDE
- In your project, click "Create View"
- SQL IDE opens: You'll see the SQL editor with your data sources available
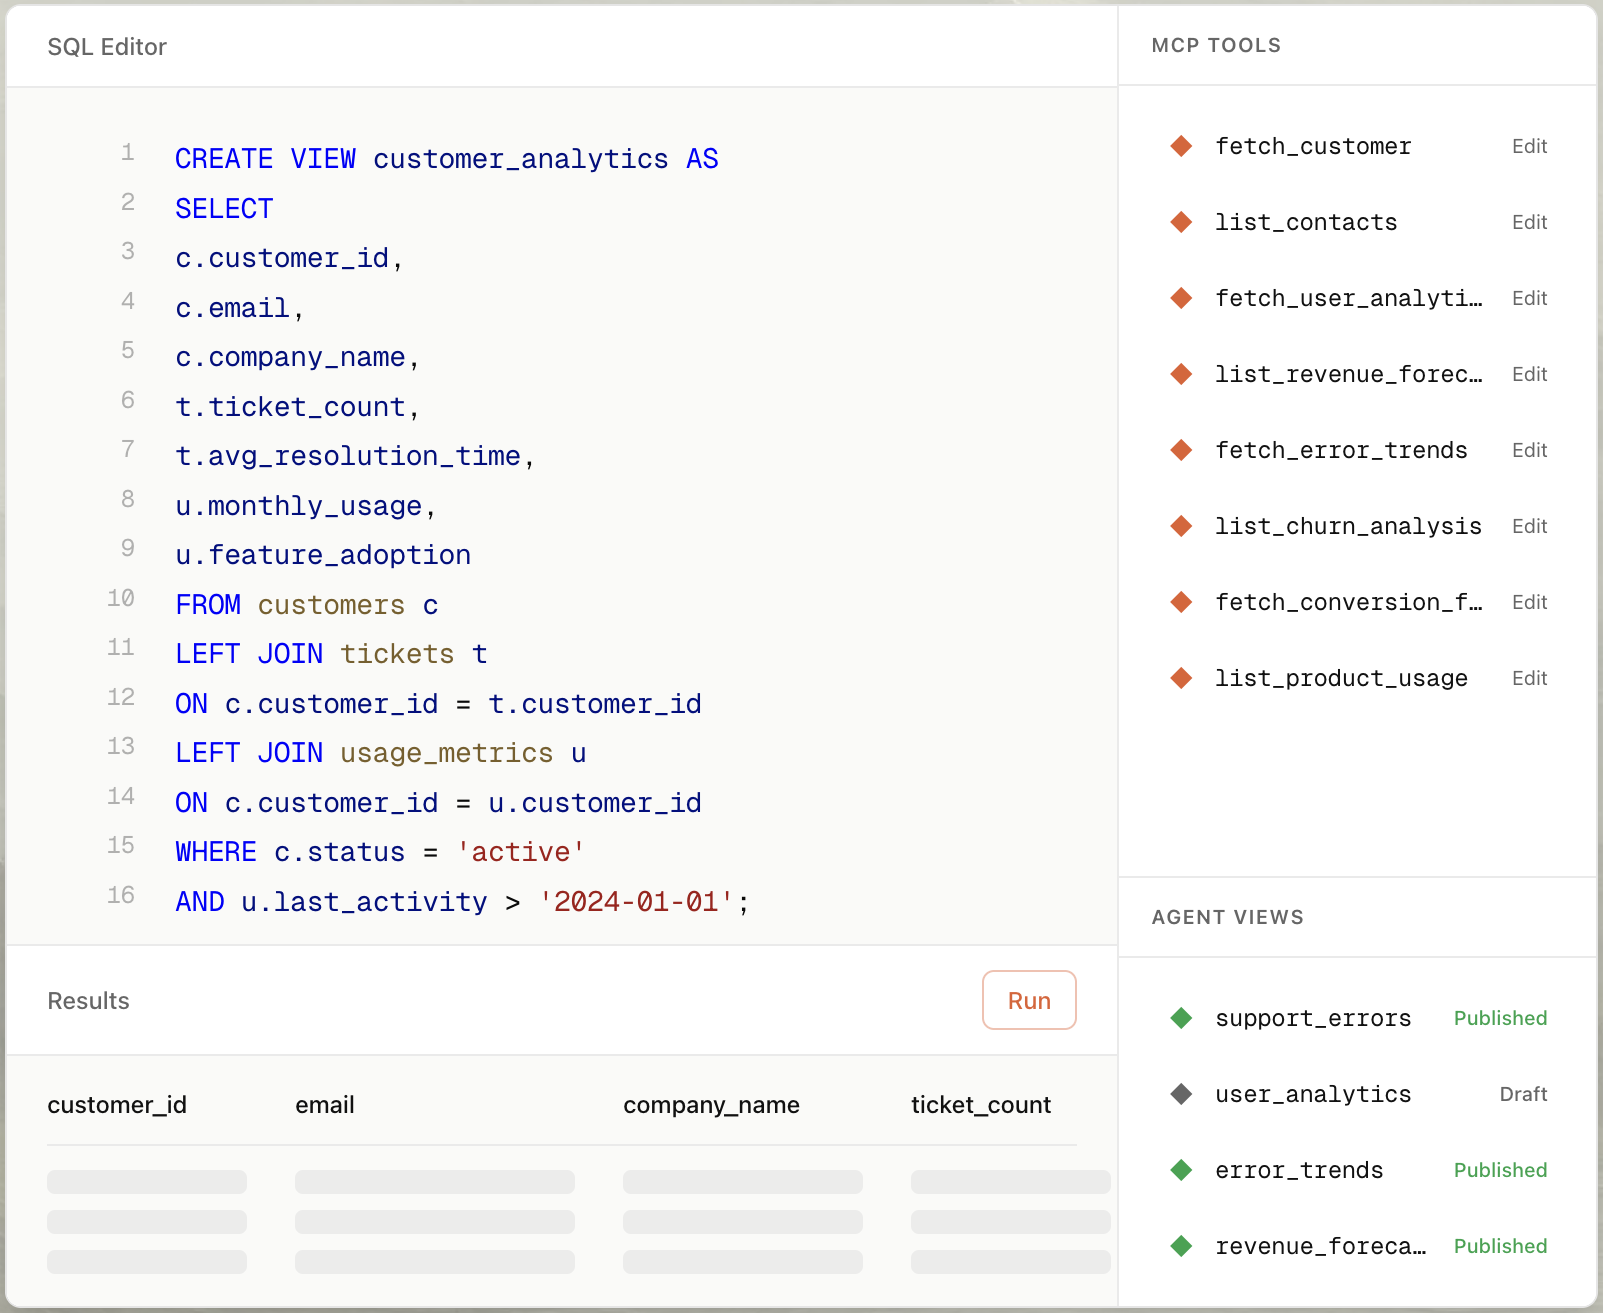
3.2: Write Your Query
Let's create a simple customer view that includes order information:
-- Customer Support View
-- Combines customer data with order history for support queries

SELECT
  c.customer_id,
  c.email,
  c.name,
  c.signup_date,
  c.status as customer_status,
  COUNT(o.order_id) as total_orders,
  SUM(o.amount) as total_revenue,
  MAX(o.order_date) as last_order_date,
  CASE
    WHEN MAX(o.order_date) < CURRENT_DATE - INTERVAL '90 days' THEN 'Inactive'
    WHEN MAX(o.order_date) < CURRENT_DATE - INTERVAL '30 days' THEN 'At Risk'
    ELSE 'Active'
  END as customer_health
FROM postgres_production.customers c
LEFT JOIN postgres_production.orders o
  ON c.customer_id = o.customer_id
WHERE c.status = 'active'
GROUP BY c.customer_id, c.email, c.name, c.signup_date, c.status;
What this does:
- Joins customers with orders
- Calculates total orders and revenue per customer
- Identifies last order date
- Adds a customer health status based on recency
Adjust for your schema: Modify table names, column names, and join conditions to match your database structure.
3.3: Test Your Query
- Click "Run Query": Test the query to make sure it works
- Review results: Check that data looks correct
- Fix any errors: Adjust the query if needed
3.4: Save Your View
- Click "Save View"
- Name it:
customer_support_view - Add description: "Unified customer view with order history for support queries"
- Save
Time check: ~27 minutes total. If you're running into SQL issues, simplify the query—you can always refine it later.
Step 4: Build an MCP Tool (10 minutes)
Now let's turn your view into an MCP tool that agents can use.
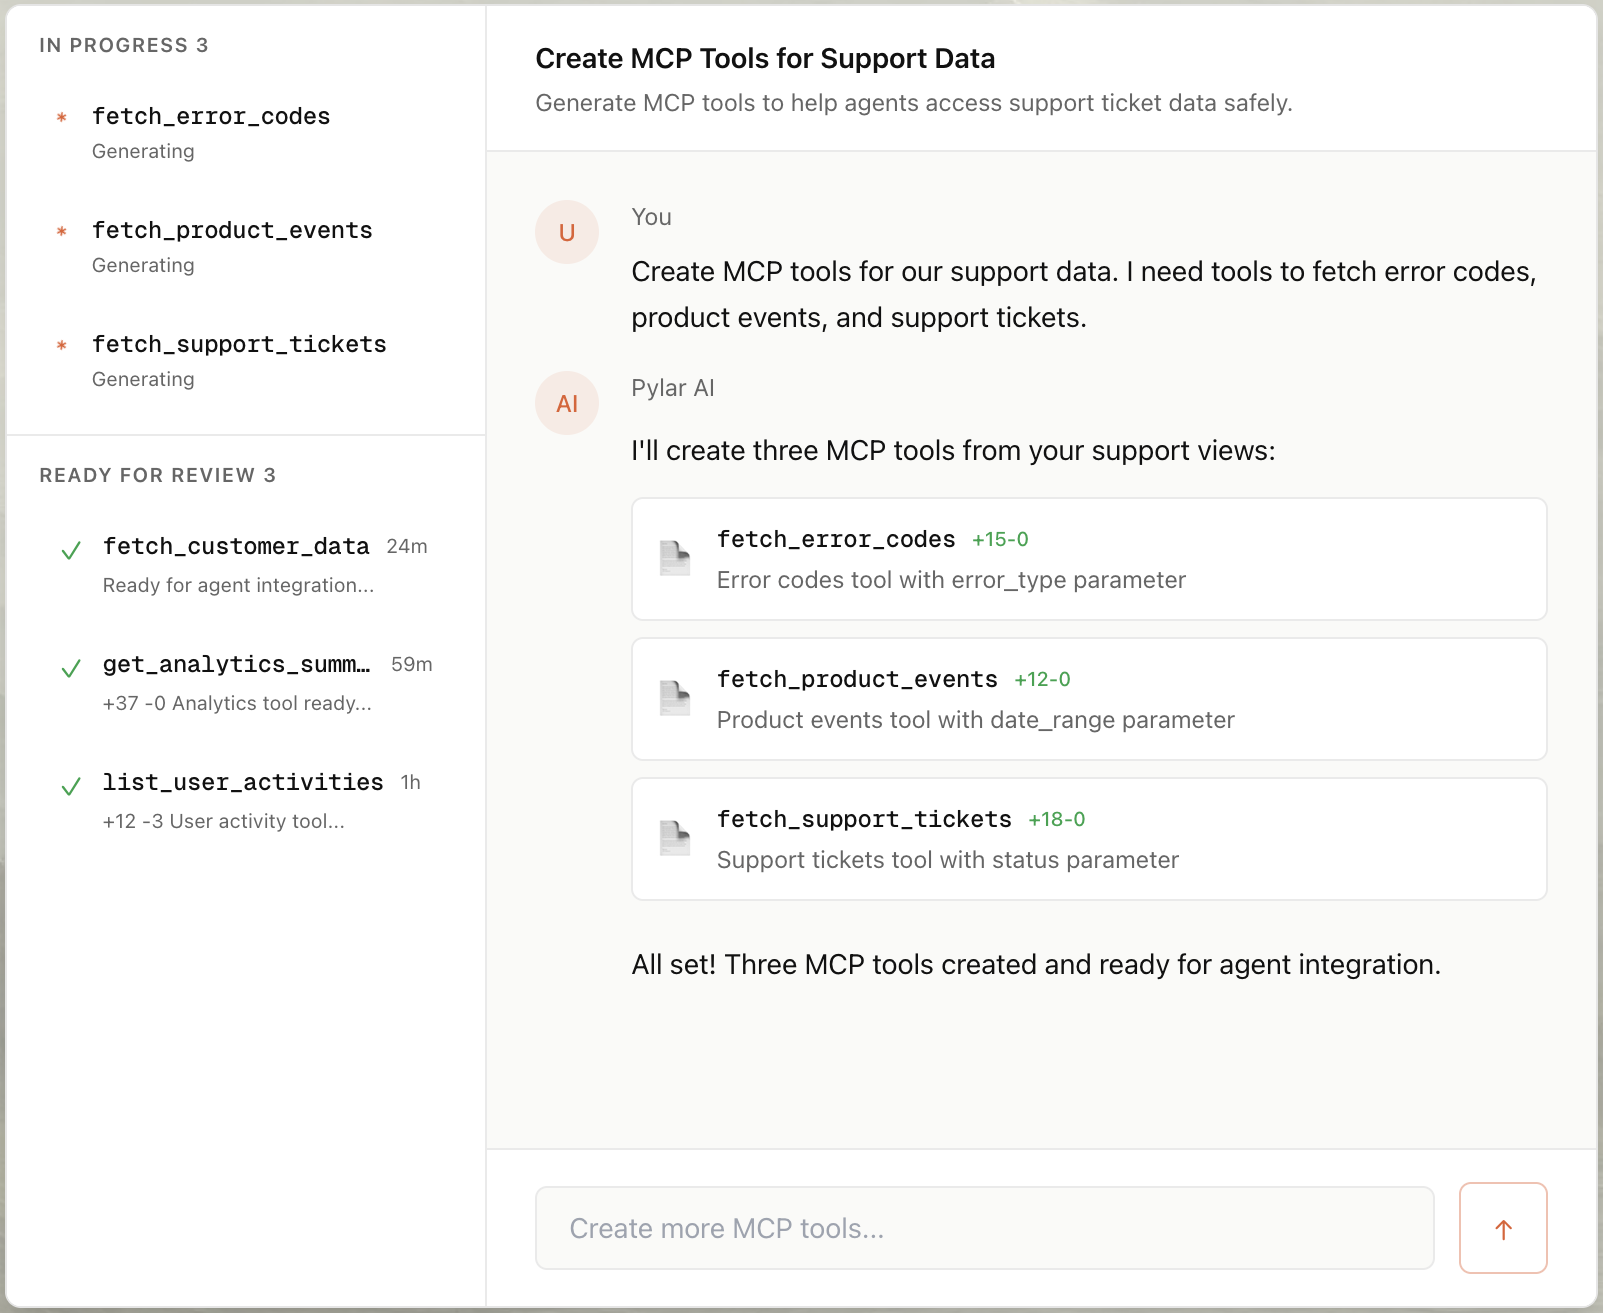
4.1: Create Tool with AI
- Click on your view: Select
customer_support_viewin the sidebar - Click "Create MCP Tool"
- Select "Create with AI"
-
Write a prompt:
"Create a tool to get customer information by customer ID or email. The tool should return customer details, order history, and health status."
-
Review generated tool: Pylar's AI will configure:
- Tool name (e.g.,
get_customer_info) - Description
- Parameters (customer_id, email)
- Query logic
- Tool name (e.g.,
-
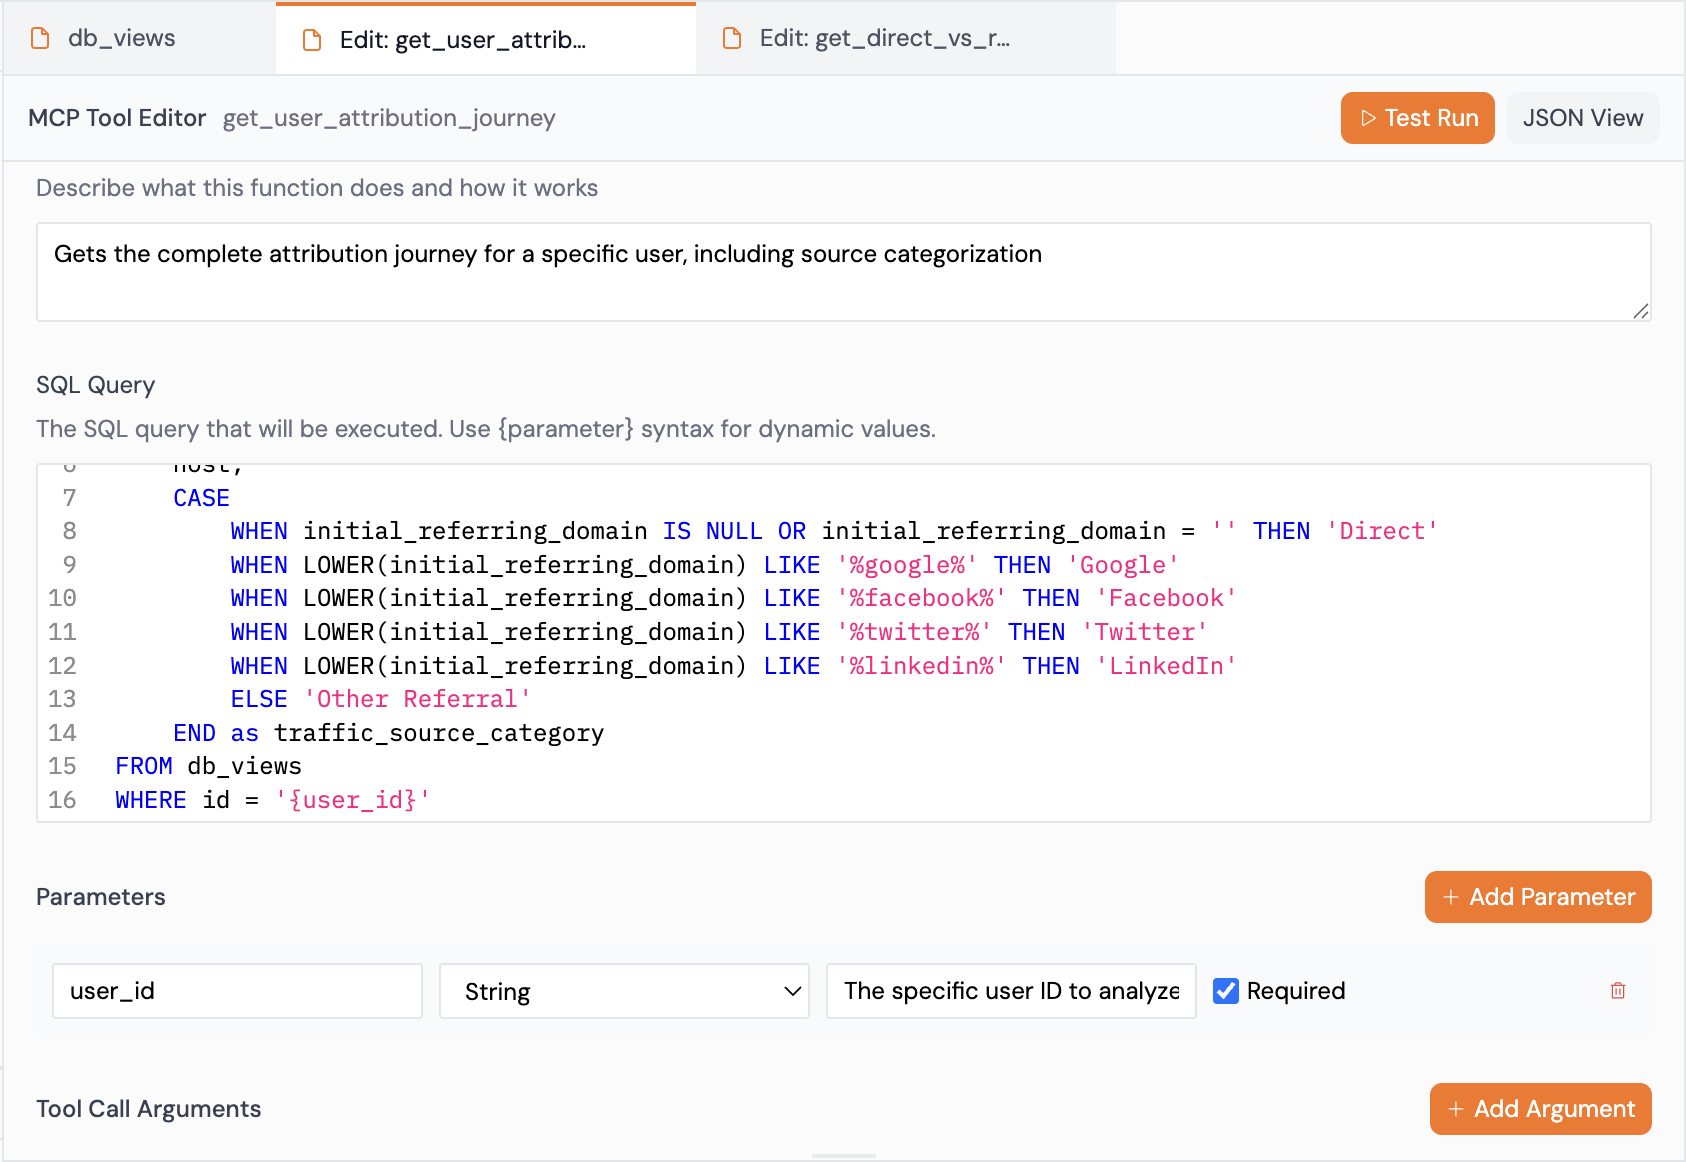
Make adjustments (if needed):
- Update parameter names
- Refine description
- Adjust query filters
-
Click "Save Tool"
4.2: Test Your Tool
- Click "Test Run" on your tool
- Enter test parameters:
customer_id:12345(or a real customer ID from your database)- Or
email:customer@example.com
- Click "Run Test"
- Verify results: Check that the tool returns correct data
If the test fails:
- Check parameter names match your query placeholders
- Verify the query works in SQL IDE
- Review error messages
Time check: ~37 minutes total.
Step 5: Publish Your Tool (5 minutes)
Now let's publish your tool to make it available to agents.
5.1: Publish
- Click "Publish": In the right sidebar, click "Publish"
- Generate Token: Click "Generate Token" in the popup
- Copy Credentials: You'll see two values:
- MCP HTTP Stream URL:
https://mcp.publish.pylar.ai/mcp - Authorization Bearer Token:
Bearer eyJhbGciOiJIUzI1NiIsInR5cCI6IkpXVCJ9...
- MCP HTTP Stream URL:

Important: Copy both values and store them securely. You'll need them to connect to your agent builder.
5.2: Store Credentials Safely
- Password manager: Store in 1Password, LastPass, etc.
- Secure notes: Keep in a secure location
- Never commit to Git: Don't put tokens in version control
Time check: ~42 minutes total.
Step 6: Connect to Agent Builder (10 minutes)
Now let's connect your tool to an agent builder. I'll use OpenAI Platform as an example, but the process is similar for other builders.
6.1: Open Agent Builder
- Navigate to OpenAI Platform: Go to platform.openai.com
- Sign in: Log in to your account
- Open Agent Builder: Navigate to the Agent Builder section
6.2: Create or Open an Agent
- Create new agent: Click "Create" or "New Agent"
- Name it: "Customer Support Assistant"
- Add description: "Helps answer questions about customers and orders"
6.3: Connect MCP Server
- Find Connect option: Look for "Connect", "Add Tool", or "MCP Server" in the tools section
- Click "Connect": Add a new MCP server connection
- Enter credentials:
- MCP Server URL: Paste
https://mcp.publish.pylar.ai/mcp - Authorization Token: Paste your full Bearer Token (including "Bearer ")
- MCP Server URL: Paste
- Save: Click "Save" or "Connect"
What happens: OpenAI connects to Pylar's MCP server and discovers your published tools. You should see your tool (get_customer_info) appear in the list.

6.4: Configure Tool Access
- Review tools: You'll see your Pylar tool in the list
- Enable tool: Make sure it's selected/enabled
- Set approval (optional): Choose auto-approve or require approval
- Save: Confirm your selections
Time check: ~52 minutes total.
Step 7: Test Your Agent (5 minutes)
Now let's verify that your agent can actually use your tool.
7.1: Open Preview
- Click "Preview": In the Agent Builder, click the "Preview" button
- Test interface opens: You'll see a chat interface
7.2: Ask Test Questions
Try these questions:
-
"Get customer information for customer ID 12345"
- The agent should call your
get_customer_infotool - It should return customer details, order history, and health status
- The agent should call your
-
"What's the status of customer@example.com?"
- The agent should use the email parameter
- It should return the customer's information
-
"Show me customers who haven't ordered in 90 days"
- The agent might need to call the tool multiple times or you might need to refine the tool
- This tests how the agent handles your data
7.3: Verify Results
Check that:
- ✅ Agent successfully calls your tool
- ✅ Results are correct
- ✅ Agent uses the data to answer questions
- ✅ No errors occur
If something fails:
- Check tool is enabled in Agent Builder
- Verify credentials are correct
- Review error messages in Agent Builder
- Test tool again in Pylar
Time check: ~57 minutes total.
Step 8: Set Up Evals (3 minutes)
Finally, let's set up monitoring so you can see how agents use your tool.
8.1: Access Evals
- In Pylar, click "Eval" in the top-right corner
- Dashboard opens: You'll see the Evaluation Dashboard
8.2: Review Metrics
Once agents start using your tool, you'll see:
- Total Count: How many times the tool was called
- Success Count: Successful calls
- Error Count: Failed calls
- Success Rate: Percentage of successful calls
8.3: Monitor Usage
- Check regularly: Review Evals weekly or daily
- Look for errors: Investigate any failures
- Track patterns: See how agents use your tool
- Optimize: Refine tools based on usage
Time check: ~60 minutes total. You're done!
Real-World Example: What You Just Built
You've built a complete customer support agent workflow. Here's what it can do:
Example Interactions
User: "What's the status of customer 12345?"
Agent:
- Calls
get_customer_infowithcustomer_id: 12345 - Gets customer data from your view
- Responds: "Customer 12345 (customer@example.com) has placed 5 orders totaling $1,250. Last order was 15 days ago. Status: Active."
User: "Which customers are at risk?"
Agent:
- Calls
get_customer_infomultiple times (or you could create a separate tool for this) - Filters for customers with health status "At Risk"
- Responds: "Here are customers at risk: [list of customers]"
How This Helps Your Team
- Faster support: Support agents get customer context instantly
- Better answers: Agents have complete customer history
- Reduced errors: No manual SQL queries or data lookups
- Scalable: Works for any number of customers
Common Pitfalls & Tips
I've seen teams make these mistakes when building their first workflow. Here's how to avoid them.
Pitfall 1: Skipping the Test Step
Don't skip testing your tool before publishing. I've seen teams publish tools that fail in production.
Why this matters: A tool that fails in production creates a bad experience. The agent returns errors, users get frustrated, and you have to debug under pressure.
How to avoid it: Always test your tool in Pylar first using "Test Run". Verify it works with real data before connecting to agents.
Pitfall 2: Not Whitelisting IP First
Don't try to connect before whitelisting Pylar's IP. This is the #1 reason connections fail.
Why this matters: Without whitelisting, Pylar can't connect to your database. You'll spend time debugging credentials when the real issue is network access.
How to avoid it: Always whitelist 34.122.205.142 before connecting. Do it first, then test the connection.
Pitfall 3: Complex Queries on First Try
Don't start with complex queries. Start simple, then add complexity.
Why this matters: Complex queries are harder to debug. If something breaks, you won't know which part is the problem.
How to avoid it: Start with a simple SELECT query. Once it works, add joins, filters, and aggregations incrementally.
Pitfall 4: Not Testing with Real Data
Don't test with fake data. Use real data from your database.
Why this matters: Fake data might not reveal real issues. Real data shows actual problems you'll encounter in production.
How to avoid it: Test with actual customer IDs, emails, or other real identifiers from your database.
Pitfall 5: Forgetting to Monitor
Don't build the agent and forget about it. Monitor usage with Evals.
Why this matters: You won't know if the agent is working well or if there are issues. Problems compound over time if you don't catch them early.
How to avoid it: Set up Evals and check them regularly. Review success rates, errors, and usage patterns.
Best Practices Summary
Here's a quick checklist:
- ✅ Whitelist IP first: Always whitelist
34.122.205.142before connecting - ✅ Start simple: Begin with simple queries, add complexity later
- ✅ Test thoroughly: Test tools with real data before publishing
- ✅ Monitor usage: Set up Evals and check regularly
- ✅ Iterate: Refine based on real usage, not assumptions
- ✅ Document: Note what works and what doesn't for future reference
Next Steps
You've built a complete internal agent workflow. That's a huge accomplishment. Now you can:
-
Expand the agent: Add more tools for different use cases (order history, support tickets, etc.)
-
Refine based on usage: Use Evals to see how agents use your tools and optimize them
-
Build more agents: Create agents for different teams (sales, product, finance)
-
Connect more data sources: Add BigQuery, Snowflake, or SaaS tools to enrich your views
-
Share with your team: Deploy the agent so your team can actually use it
The key is to start simple and iterate. Your first agent doesn't need to be perfect—it just needs to work. You can always refine it later based on real usage.
If you want to keep going, the next step is expanding your agent with more tools and data sources. That's where you'll see the real value—agents th
Frequently Asked Questions
What if I don't have customer and order data?
Start with whatever data you have. You can build a view with:
- User data only
- Product data
- Support tickets
- Any data that would be useful for an agent
The process is the same—just adjust the SQL query to match your schema.
Can I use multiple data sources?
Yes! You can join data from multiple sources in a single view. For example:
- Join Postgres customers with BigQuery analytics
- Join Snowflake orders with HubSpot contacts
- Join any combination of connected sources
See the "Using Pylar with BigQuery, Snowflake, and Postgres" tutorial for details.
What if my tool doesn't work in the agent?
Check a few things:
- Verify tool is enabled in Agent Builder
- Check credentials are correct (full Bearer Token including "Bearer ")
- Review error messages in Agent Builder
- Test tool again in Pylar to confirm it works
- Check Evals for error details
How do I add more tools to my agent?
Create additional MCP tools on your view (or create new views and tools). Then:
- Tools are automatically available after publishing
- No need to republish—just refresh the connection in Agent Builder
- Enable the new tools in your agent configuration
Can I use this with other agent builders?
Yes! The same MCP credentials work with:
- Claude Desktop
- Cursor
- Windsurf
- LangGraph
- Zapier
- Make
- n8n
- Any MCP-compatible builder
Just paste your credentials into the builder's MCP configuration.
What if I need to update my view?
Update your view in Pylar. Changes automatically reflect in all connected agents—no need to republish or reconnect. This is one of Pylar's key benefits.
How do I know if my agent is working well?
Use Pylar Evals to monitor:
- Success rates (aim for 90%+)
- Error patterns
- Usage frequency
- Query patterns
High usage and low error rates indicate the agent is working well.
Can I build this in less than 60 minutes?
Yes, if you:
- Have all credentials ready
- Know your database schema well
- Use simple queries
- Skip optional steps
But I recommend taking the full 60 minutes to do it right. Rushing leads to mistakes that take longer to fix.